


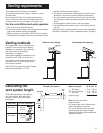
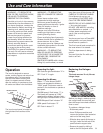


7
7. Place one of the chimney
brackets against the wall so that its top
edge is 1/16” (2.0 mm) from the ceiling
or soffit and level.
• Align the center notches of the
bracket and the centerline.
• Mark the centers of the bracket holes
8. Place the other chimney bracket
on the wall so that it’s lower edge is
16-3/16” (41.1 cm) from the ceiling or
soffit and level.
• Align the center notches of the
bracket and the centerline.
• Mark the centers of the bracket holes.
9. If installing into wood, drill four
3/32” (2.4 mm) holes.
If installing into plaster or dry wall,
drill four 3/16” (4.8 mm) holes. Insert
wall anchors into each hole flush with
the wall.
10. Attach each bracket to wall
with two No. 8 Phillips head wood
screws. Tighten screws securely.
11. If the hood is to be vented to
the outside and the vent system has
not been installed, install it now. The
vent system must be installed before
the hood. See “Venting methods” on
Page 4.
Excessive Weight Hazard
Use two or more people to move and
install range hood.
Failure to do so can result in back or
other injury.
WARNING
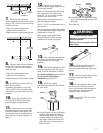
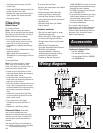
13. Use a flat-blade screwdriver
and tighten the two leveling screws
located close to the mounting
brackets.
14. Use Phillips screwdriver and
remove wiring box cover. Set cover
aside, it will be reinstalled in Step 21.
For vented installations, go to Step 16.
For non-vented (recirculating)
installations, go to Step 15.
15. Install non-vented
(recirculating) conversion kit ordered
for your hood.
a. Fit the diverter over the vent motor
exhaust outlet and push down to
seat on outlet. Make sure diverter
exhaust outlets are parallel with
vent motor sides so that they will
align with vent cover openings in
lower chimney.
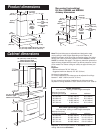
leveling
screw
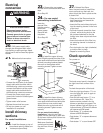
16. Lift the hood and place the
hood mounting brackets over the
mounting screws. Securely tighten the
screws.
17. Level the hood. Adjust the two
leveling screws (See Step 13) as
needed.
18. If not previously done, center
the wiring hole in the box over the
hole in the wall and mark the two box
mounting holes and drill holes as
needed for your installation.
19. Install 1/2” (12.7 mm) strain
relief in wiring box.
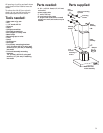
vertical
centerline
center
notches
1/16"
(1.6 mm)
16-13/16"
(41.1 mm)
12. Determine the location
where the power supply cable will be
run through the wall.
Note: For wiring flexibility, the wiring
box is external to the hood motor.
About 24” (61 cm) of wire connects
the box to the hood motor.
Make sure the lower chimney cover
will hide selected location.
Drill a 1-1/4” (3.2 cm) diameter hole at
this location.
The wiring box mounting holes needed
for your installation can be marked and
drilled now or in Step 16.
Pull enough power supply cable
through the wall to allow for easy
connection to hood’s wiring box.
diverter
vent
motor
b. Install the two vent extension pieces
onto the diverter pushing them until
they stop.
Go to Step 16.
diverter
exhaust
extension