


For vented installations:
22. Install the damper on top of
the exhaust opening. Make sure
the damper opens freely.
8
Install chimney
sections
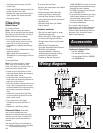
Electrical
connection
Electrical Shock Hazard
Disconnect power before
making electrical connections.
Connect ground wire to green
ground screw in terminal box.
Failure to do so can result in
death or electrical shock.
WARNING
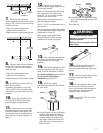
21. Make electrical connection:
• Connect the white wire of the power
supply cable with the white lead in
the hood using a twist-on connector;
connect the black wire of the power
supply cable with the black lead in
the hood using a twist-on connector.
• Connect the power supply green
ground wire under the unused green,
ground screw.
• Tighten strain relief screws.
• Replace the terminal box cover.
• Do not turn power on until
installation is completed.
23. Connect the vent system
and seal all the connections with duct
tape.
Go to Step 25.
24. For non-vented
(recirculating) installations:
Insert the
charcoal filter
into the opening
behind the
center grease
filter and lock
into place.
Go to Step 25.
25. Install the upper chimney
cover. Slightly spread the sides of the
cover apart and hook them behind the
chimney mounting brackets. Attach
the cover to the brackets with 4
mounting screws. Tighten screws
securely.
26. Install the lower chimney
cover. Slightly spread the sides of the
cover apart and hook them behind the
upper chimney cover and the wall.
Attach the cover to the hood with 2
mounting screws. Tighten screws
securely.
For non-vented (recirculating)
installations: Insert the two vent
grates into the openings on each side
of the lower chimney and fit them into
the diverter outlets.
Make sure directional
symbols point toward
top and front of hood
as shown.
mounting
screws
mounting
screws
27. Reinstall the filters.
Note: Use two hands to install filter,
one to pull and turn the knob, the
other to hold the filter in place so that
it doesn’t fall.
• Grasp one of the filters so that the
knob faces down and toward the
back of the hood.
• Insert the filter end without the knob
into the retaining channel in the front
of the hood.
• Pull knob forward, toward the front
of hood, while turning knob to the
left (counterclockwise) so that the
locking lever does not protrude from
the filter.
• Insert the knob end of the filter into
the retaining channel in the back of
the hood.
• Turn the knob to the right (clockwise)
to lock the filter in place.
• Repeat for remaining filters.
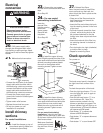
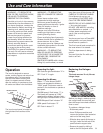
Check operation
Turn power on.
The hood control panel is located on
the right-hand front surface of the
hood.
To check the operation of the hood:
• Push the right-hand button “L” in to
turn the lights ON, push in again to
turn lights OFF.
• Push the left-hand button “1” in to
turn the blower ON. Note: This
button must be pushed in for the
blower to operate at any speed. The
blower indicator light will light up to
indicate blower is ON and the blower
will operate at LOW speed.
• Push button “2” to operate the
blower at MEDIUM speed.
• Push button “3” to operate blower at
HIGH speed.
• Push button “1” to turn blower OFF.
1
2
3
L
blower indicator
light
hood wiring
green
ground
screw
power
supply
cable
white wires
twist-on
connectors
black
wires
20. Pull power supply cable
through the wiring box strain relief.
Use caulking to seal openings. Attach
wiring box to wall and securely tighten
screws.
front of
hood
vent
grate