


24
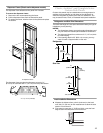
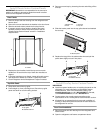
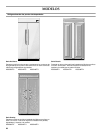
3. Remove the handle-side and top trims.
4. Slide the custom panels into the bottom and hinge side trims
on the refrigerator compartment and freezer compartment
doors, making sure that the backer panel fits into the hinge
side trims.
5. Reinstall the handle-side and top trims.
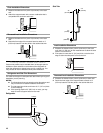
6. Remove the skin from the screw covers. Slide or snap the
screw covers into the handle trim section.
7. Check refrigerator level and alignment. Adjust if needed.
Adjust Doors
Door Height Adjustment
Use the following steps to adjust the door height, up or down,
after the doors have been leveled.
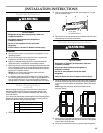
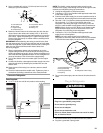
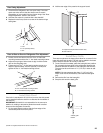
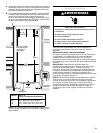
1. Open the freezer or refrigerator door. Locate the bottom hinge
and remove the door stop screw.
Classic and Architect
®
Models
Remove the door stop screw from the bottom side of the
hinge with a ³⁄₈" open end wrench.
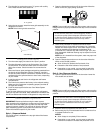
Overlay Models
Remove the two door stop screws: one from the bottom side
using a ³⁄₈" open end wrench and one from the top side using
a ⁵⁄₃₂" Allen wrench.
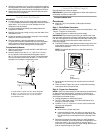
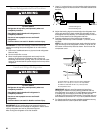
2. Remove the locking plate as shown.
3. Turn the bushing located underneath the bottom of the hinge
using a ¹⁄₂" open end wrench. Turning the bushing to the left
will lower the door. Turning the bushing right will raise the
door.
4. After adjusting, check the doors to make sure they are even at
the top and bottom. If the doors are not even, continue to turn
the bushing to adjust the door height.
5. Replace the locking plate.
6. Turn the bushing slightly to align the hinge and locking plate
screw holes.
7. Replace the door stop screw or screws and tighten.
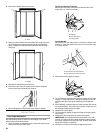
IMPORTANT: Do not place the door stop screw in the 130°
position on Overlay Series models unless the custom panels
have been routed on the hinge side. See “Overlay Series Door
Panel and Cabinetry Clearance.”
8. Recheck to make sure the doors are aligned and even.
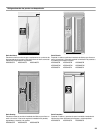
A.Trims
A.Panels
A
A
A
A
A. Bushing
B. Door stop screw
C. Locking plate
A. Door stop screw from bottom
B. Door stop screw from top (110°)
A BC
AB