


KoldFront Built-in Ice Maker 8
OPERATION
Final Check List before Operation
1. Have all packing materials and tape been removed from the interior
and exterior of the ice maker?
2. Did you clean the ice storage bin?
3. Have the installation instructions been followed, including connecting
the machine to water and electricity? Does the unit have proper
drainage?
4. Has the machine been leveled?
5. Is the ice maker in a site where the ambient temperature is between
50º F and 100ºF and the water temperature between 41º F and 90º F all
year round?
6. Has the water supply pressure been checked to ensure a minimum of
15 psig with a static pressure not to exceed 80 psig?
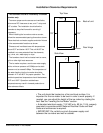
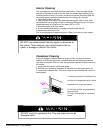
7. Is there a clearance of at least 2/5” at the rear, 1” at the top and 1/5” at
the sides for proper air circulation?
8. Has the power supply voltage been checked or tested against the
nameplate rating? And has proper grounding been installed for the ice
maker?
9. Is the ice maker plugged in?
10. Have you turned on the main water supply and the tap?
11. Have you checked for leaks at all water supply connections- and at
the drain?
Operating Method
1. Turn on the water tap, let the water trough fill, then switch the
ICE/OFF/WASH switch on the front panel to the ICE position. The ice
maker will start working automatically.
2. After three minutes, the machine will automatically go to the ice making
stage, and the sound of flowing water will be heard.
3. When the batch of ice has been fully formed, ice will automatically be
harvested to the ice storage bin.
4. When the ice storage bin is full, the sheet of cubes will not fall
completely and will hold the ice-full probe open. The machine stops
making ice and automatically progresses to the cold preservation stage.
During this stage, the compressor works regularly to keep the
temperature lower to reduce ice melting.
5. The unit will start making ice again after the ice cubes are removed. At
that time, the ice-full probe swings back to operating position.