


Installation
Place the appliance on a stable, heat resistant
surface: do not use it on a soft surface such as
a table pad.
Do not place the appliance on or near
slippery or hot surfaces. Do not let the cord
hang down over a source of heat (hot plates,
gas cookers, etc.).
Before using the appliance for the first time:
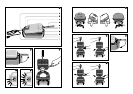
• Put the handle in a horizontal position (2).
• Open the appliance.
• Remove any packaging, stickers and accessories
from both inside and outside the appliance.
• Pour a little oil onto the plates. Wipe with a
soft cloth.
Place the spill tray (i) underneath the appliance (1).
Plugging in and preheating
the appliance
Close the appliance.
Check that your electrical installation is
compatible with the power and voltage
shown underneath the appliance.
Plug the appliance into an earthed socket
only.
If the power supply cord is damaged, it must
be replaced by the manufacturer or its
service agent or a similarly qualified person
in order to avoid a hazard.
Plug the cord into a socket: the red “on/off”
light (a) comes on (3).
Set the thermostat (c) to 6 and let the appliance
preheat for approximately 5 minutes: when it
has finished preheating, the green “ready”
light (b) comes on (4).
When the appliance is used for the first
time, it may give off a slight odour and
smoke, this is normal.
Cooking
Set the thermostat (c) to the position of your
choice or as required for the recipe.
Open the appliance.
Do not touch the hot surfaces of the
appliance: use the handle (e).
Use a ladle to pour waffle batter onto the
bottom plate (f) of the appliance (5).
Close the appliance and press down firmly.
Wait 10 seconds then turn the appliance over,
turning the handle (e) to the right (6-I).
Cook the waffles for the time indicated in the
recipe.
When they are cooked, turn the appliance over
again, turning the handle (e) to the left (6-II).
Open the appliance and remove the waffles.
After use
Set the thermostat to the minimum setting.
Unplug the cord.
Let the appliance cool down completely in the
open position.
Clean the plates (f), the spill tray (i) and the
body of the appliance with a sponge and
washing up liquid.
The plates (f) and the spill tray (i) are
dishwasher-safe.
Do not use a metal scouring pad or
scouring powder.
Never immerse the appliance or the cord in
water.
Storage
To save space, press the handle release button (d)
and fold the handle down (9).
9
8
Connect the Brown wire to the terminal in the
plug marked “L” or coloured Red.
Connect the Blue wire to the terminal in the
plug marked “N” or coloured Black.
Seek professional advice if you are unsure of
the correct procedure for the above.
ABOUT YOUR FACTORY FITTED PLUG
The cord is already fitted with a plug
incorporating an appropriate fuse. If the plug
does not fit your socket outlet, see paragraph
below. Should you need to replace the fuse in
the plug supplied, an appropriately rated
approved BS 1362 fuse must be used (refer to
electrical specification for fuse rating).
If the plug supplied does not fit your socket
outlet, it should be removed from the mains
lead and disposed of safely. The flexible cord
insulation should be stripped back as
appropriate and a suitable alternative plug
fitted. The replacement plug must be equipped
with an appropriate fuse. If the plug has
external access to the fuse (non-rewirable type
plug) please note that the fuse cover is an
important part of the plug. Please ensure that it
is always refitted correctly. If you lose this cover,
please do not use the plug. You may contact
our helpline for a replacement.
For any problems or queries, please contact our
Customer Relations Team first for expert help
and advice:
0845 602 1454 – UK (calls charged at local rate)
(01) 47 51947 – Ireland
Handling the plates
Check that the appliance is cold and
unplugged before handling the plates.
• To remove the plates (7):
Open the appliance and hold the handle (e)
with one hand. With the other hand, grasp the
plate (f) at the notches (h), pull it sideways and
disengage it from the retaining pins (g) to
remove it.
• To insert the plates (8):
Insert the plate (f) at an angle into the retaining
pins (g) and press on the opposite side to
secure it correctly in the appliance.
English
Thank you for purchasing this KRUPS appliance.
Whatever model you have, please read these
instructions carefully and keep them for future
reference.
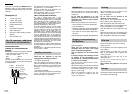
Description (1)
a “On/off” light (red)
b “Ready” light (green)
c Adjustable thermostat
d Handle release button
e Handle
f Removable waffle plates
g Plate retaining pins
h Notches for easier handling of plates
i Spill tray
j Non-removable cord
For U.K. users only : additional
information and instructions
WIRING INSTRUCTIONS
WARNING: ALL APPLIANCES MUST BE
EARTHED.
IMPORTANT: the wires in this lead are coloured
in accordance with the following codes.
Green and Yellow : Earth
Blue : Neutral
Brown : Live
Connect the Green/Yellow wire to the terminal
in the plug marked “E” (or by the earth symbol)
or coloured Green.
N: Blue
or black
E: Green and
yellow or green
L: Brown
or red
Fit correct
fuse(13 amp)
Use cable
gripper