


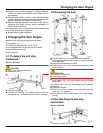
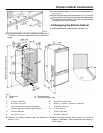
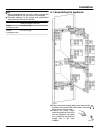
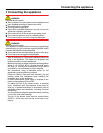

u
Slightly loosen the
screws
Fig. 20 (55)
.
u
Secure the top
mounting bracket
Fig. 20 (50)
to the unit
wall with a ø4x19
chipboard screw
Fig. 20 (29)
.
u
Break off the protruding
end of the cover
Fig. 20 (53)
.
Fig. 20
u
Tighten the screws
Fig. 20 (55)
.
u
Place the cover
Fig. 20 (53)
in position.
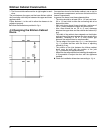
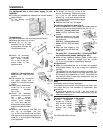
On the handle side at the bottom:
u
Slightly loosen the
screws
Fig. 21 (51)
.
u
Secure the bottom
mounting bracket
Fig. 21 (50)
to the unit wall
with a ø4x19 chipboard
screw
Fig. 21 (29)
.
u
Break off the protruding
end of the cover
Fig. 21 (53)
.
u
Tighten the screws
Fig. 21 (51)
.
u
Place the cover
Fig. 21 (54)
into position on
the bottom mounting
bracket
Fig. 21 (50)
.
Fig. 21
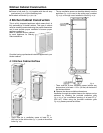
u
Slide the equalizer trim
Fig. 12 (20)
toward the handle side
as far as it will go.
u
Close the appliance door.
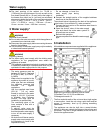
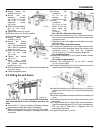
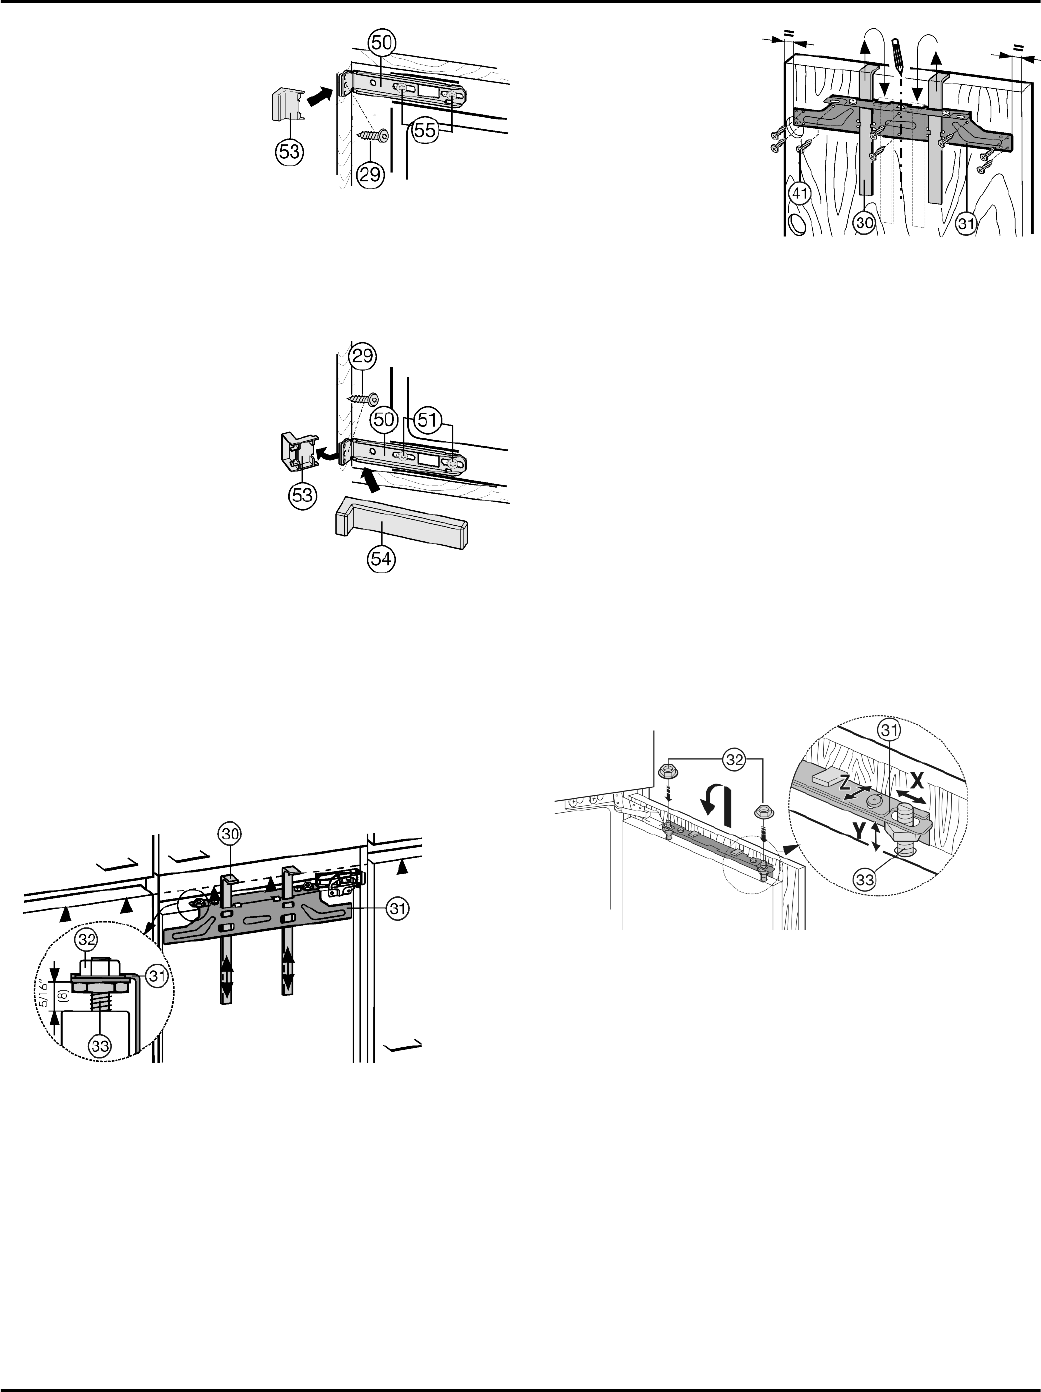
6.2 Fitting the unit doors
Fig. 22
The fitting aids
Fig. 22 (30)
are required for both doors.
You must therefore fit the unit doors one after the
other.
u
Verify the 5/16 '' (8 mm) presetting. (Distance between
appliance door and lower edge of crosspiece)
u
Raise the fitting aids
Fig. 22 (30)
to the unit door height.
Bottom stop edge ▲ of fitting aid = top edge of unit door
to be fitted.
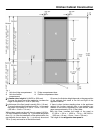
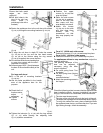
u
Unscrew the
crosspiece
Fig. 23 (31)
by
undoing the
locknuts
Fig. 23 (32)
.
u
Hang the
crosspiece
Fig. 23 (31)
on the
inside of the unit
door using the
fitting aids
Fig. 23 (30)
.
Fig. 23
For a 23-5/8 '' (600 mm) wide recess:
u
To center the crosspiece
Fig. 23 (31)
: Mark a short center
line on the unit door and place the tip of the arrow on the
crosspiece over it.
w
Distances to the outer edges are the same to the right
and to the left.
For a 24 '' (609.6 mm) wide recess:
u
To align the crosspiece
Fig. 23 (31)
: Mark a short center
line on the unit door and place the tip of the arrow on the
crosspiece over it. Now shift the crosspiece
Fig. 23 (31)
3/16 in. (5.5 mm) towards the hinge side.
For chipboard doors:
u
Fasten the crosspiece
Fig. 23 (31)
with at least 6 screws
Fig. 23 (41)
.
For frame and panel doors:
u
Fasten the crosspiece
Fig. 23 (31)
with 4 screws
Fig. 23 (41)
at the edge.
u
Lift up the fitting aids
Fig. 23 (30)
, turn them around, and
insert them into the adjacent openings.
Fig. 24
u
Attach the unit door on the adjusting bolts
Fig. 24 (33)
and
loosely screw the locknuts
Fig. 24 (32)
onto the adjusting
bolts.
u
Close the door.
u
Check the gap between the door and the surrounding unit
doors.
u
To laterally align the unit door: Move the unit door in the
X direction.
u
To align the unit door in height and in lateral inclination:
Adjust the adjusting bolts
Fig. 24 (33)
with a screwdriver.
w
The unit door is flush and in alignment with the
surrounding unit fronts.
u
Tighten the locknuts
Fig. 24 (32)
.
Installation
11