


8
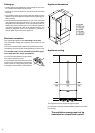
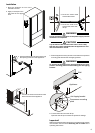
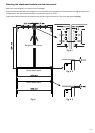
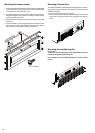
Mounting the anti-tipping device
WARNING!
The supplied anti-tipping bracket must be installed in all
cases. This prevents the appliance from tipping over when
the fully loaded door is opened.
CAUTION!
Ensure that there are no electric cables or water pipes in
the wall section to which the anti-tipping bracket is to be
secured. These could be damaged during installation.
Important!
When securing the anti-tipping bracket to a concrete floor,
use suitable plugs!
If the floor slopes down sideways, the anti-tipping
bracket must be fitted horizontally. Lay down spacers
in the appropriate positions.
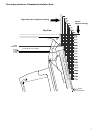
Wall
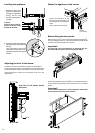
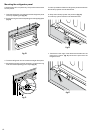
Connection to the water supply
Safety instructions and warnings
•Donotconnecttothewatersupplywhilethecombinedrefrig-
erator-freezerisconnectedtotheelectricitysupply.
• The connection to the mains water supply may only be
made by trained personnel.
• The water quality must comply with the drinking water
directives of the country in which the appliance is used.
•Theicemakerisdesignedexclusivelytomakeicecubesin
quantitiesrequiredbyahouseholdandmayonlybeoperated
withwatersuitableforthispurpose.
• Allrepairsandworkontheicemakermayonlybecarriedout
bycustomerservicepersonnelorothertrainedpersonnel.
• The manufacturer cannot accept liability for damage
caused by a faulty connection to the mains water supply.
Water pressure
The water pressure must be between 150 and
600 KPa (1.5 - 6 bar).
Important!
Ifthewaterfilter
isinsertedintheappliance,thewater pressure
mustliebetween300 and 600 KPa (3 - 6 bar).
If the water pressure with the inserted water
filter is too low, this may cause the ice maker to
malfunction.
Thewatersupplytotheappli-
ancemustbethroughacold
waterpipethatcanwithstand
the operating pressure and
complies with the hygiene
regulations.
Forthis,usethestainlesssteelhosesupplied(length3m).
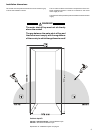
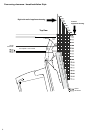
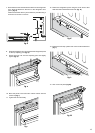
1. Markthecentrelineoftheapplianceon
thefloor.Alignthe anti-tippingbracket
centretothecentreline.
2. Securetheanti-tippingbracket
to the floor using the 3screws
(6mmx60mm)includedinthe
accessorypack.
ThedistanceEbetweentheleadingedgeofthebodyoftheunit
andtherearedgeoftheanti-tippingbracketis
Inset installation style > 610 mm + panel thickness
Frameless installation style > 610 mm