


Impinger II – Advantage Digital Express Service Manual - Domestic
22
F. Reassemble in reverse order and check system operation. Be sure capillary tube is securely in
the mount.
NOTE: Push reset button on new thermostat.
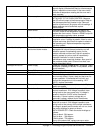
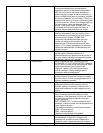
TRANSFORMER, BURNER – REPLACEMENT
A. Shut off power at main breaker.
B. Remove conveyor and front control box cover.
C. Remove all wires from transformer and mark for reassembly.
D. Remove two mounting screws from transformer base and remove transformer.
E. Reassemble in reverse order and check system operation.
OVEN CONTROL – REPLACEMENT
A. Shut off power at main breaker.
B. Remove conveyor and front control box cover.
C. Remove all wiring connections and mark for reassembly.
D. Remove oven control by pulling control from the mounting pins. Remove control from oven.
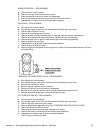
E. Before installing new oven control, set voltage jumper (located at the bottom center of the oven
control) to the proper voltage (120V/240V) position. Set frequency jumper to the proper
frequency (50Hz/60Hz). Install the four pushbutton extensions (included with the oven control)
by pushing the extensions onto the four set buttons on control.
F. Reassemble in reverse order and check system operation.
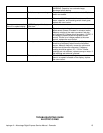
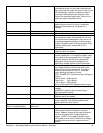
G. Set the oven control for the proper operating mode. The 1100 series ovens use a single
temperature control system. The oven control must be set to the proper operating mode. Set the
control as follows: With the oven power switch “off”, depress the “time” and “up” buttons and turn
the oven “on”. Control will indicate ”Imp I or Imp II” Release the buttons, The control will indicate
“Temp to store”. Press the “up” or “down” button until “Imp II” appears on the display. Press the
“temp” button. The control is now set for single burner operation.
TRANSFORMER – CONTROL – REPLACEMENT
See “TRANSFORMER –BURNER - REPLACEMENT
THERMOCOUPLE – REPLACEMENT
A. Shut off power at main breaker.
B. Remove conveyor and bottom finger assembly.
C. Remove front control box cover.
D. Remove thermocouple from bracket in oven chamber and pull thermocouple through tube into
control box.
E. Remove two thermocouple wires from temperature control. Note wire color and location for
reassembly
F. Reassemble in reverse order and check system operation
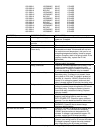
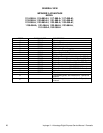
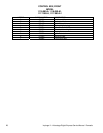
THERMOCOUPLE MEASUREMENT
TEMPERATURE (°F) D.C. MILLIVOLTS
200° 2.8
250° 4.0
300° 5.1
350° 6.0
400° 7.1
450° 8.2
500° 9.3
550° 10.4
600° 11.5