


Inspection
Remove Packaging
Your beverage center has been packed for shipment
with all parts that could be damaged by movement
securely fastened. Before using, be sure all packing
materials and tape have been removed.
Important
Keep your carton packaging until your beverage center
has been thoroughly inspected and found to be in good
condition. If there is damage, the packaging will be
needed as proof of damage in transit.
Note to Customer
This merchandise was carefully packed and thoroughly
inspected before leaving our plant. Responsibility for its
safe delivery was assumed by the carrier upon accept-
ance of the shipment. As directed on the side of your
packing carton, claims for loss or damage sustained in
transit must be made on the carrier as follows:
Exterior Damage
Make thorough damage notation on your delivery receipt
and have driver acknowledge by signature and date.
Send a written request asking for an inspection report
from carrier. Include the name of carrier representative
and the date the inspection was requested. Retain
inspection report and receipt for filing of a claim.
Concealed Damage
This must be reported to the carrier within fifteen days.
Obtain inspection report from the carrier. Retain the
inspection report for filing the claim. DO NOT RETURN
DAMAGED MERCHANDISE TO MANUFACTURER -
FILE THE CLAIM WITH THE CARRIER.
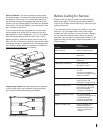
How to Install Your
Refrigerated Beverage Center
Select Location: The proper location will ensure peak
performance of your appliance. Choose a location
where the unit will be out of direct sunlight and away
from heat sources. Best performance will be main-
tained when installed within the following parameters:
Cabinet Clearance: Ventilation is required from the
bottom front section of the unit. Keep this area open
and clear of any obstructions.
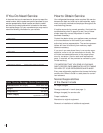
Electrical Connection: Use nominal 115 volt, 60
cycle AC only. DO NOT USE AN EXTENSION CORD
1
Ideal Ambient Temperature Range
Built-in 65° – 80°F
Free-Standing 65° – 90°F
Power Supply Cord
with 3-Prong
Grounding Plug*
Grounding Type
Wall Receptacle
Figure 1