


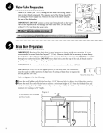
Making the Electrical Connections
. . . . . . . . . . . . . . . . . . . . . . . . . . . . . . . . . . . . . . . . . . . . . . . . . . . . . . . . . .
See the Electrical Requirements Section
CAUTION:
Verify p
ower to dishwasher is off at source.
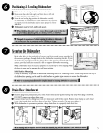
0 Remove terminal box cover.
Q In order to secure the power supply cable, a UL listed strain relief
must be used to secure the power supply to the back of terminal box.
0 s
trip approximately 3/8” (.09 cm) of insulation from incoming power
supply wires. Connect these wires to wires from dishwasher wire harness
located in the terminal box. Connect wires using the appropriate size wire
nuts, twisting and tightening securely over the wire connections. Connect
white to white and black to black.
0
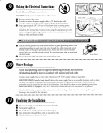
Attach external ground wire from behind washer of green grounding screw. If an
external groundwire is used, insert the wire through the cable clamp and attach
behind washer of the green grounding screw. Attach the other end of external
ground wire to a suitable external ground. If a question arises, refer to your local
electrical codes.
OS
ecure the strain relief and replace the terminal box cover.
*****************************************************************
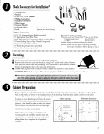
Water Hookups
. . . . . . . . . . . . . . . . . . . . . . . . . . . . . . . . . . . . . . . . . . . . . . . . . . . . . . . . . .
Check local plumbing codes for approved plumbing procedures and accessories.
All plumbing should be done in accordance with national and local codes.
Connect water supply line to water valve. Minimum 3/8” O.D. copper tubing or equivalent.
SHUTOFF VALVE:
Install a hand shutoff valve in the water supply line in an accessible location, such as under
the sink. The shutoff is optional, but recommended and may be required by local codes. Connections are
preferable located toward the left side of the dishwasher. Care should be taken to route plumbing away from
motor and blower (if equipped). DO NOT make these connections until the dishwasher is in position.
Care should be taken to protect dishwasher and waterlines leading to dishwasher from freezing. Damage from
freezing is not covered by the warranty.
*****************************************************************
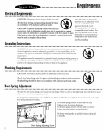
Finalizing the Installation
. . . . . . . . . . . . . . . . . . . . . . . . . . . . . . . . . . . . . . . . . . . . . . . . . . . . . . . . . .
@ Turn water supply on and check connections for leaks.
Q Turn power supply on.
@ Re-install Access and Toe panels removed in step 2.
@ Run dishwasher through Rinse only or equivalent cycle.
@ Check drain hose connection for leak.
6