


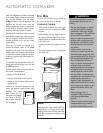

TO REMOVE THE FRAME
ASSEMBLY:
•Unload the shelf completely.
• Slide the shelf forward about two
inches (6 cm). Manually move the two
rear latches toward the shelf center.
• While supporting the entire shelf and
frame from underneath, lift slightly and
rotate the assembly approximately 30°
to allow the rear mechanism to clear
the rear rails.
7
The entire assembly can then be moved
forward and clear of the refrigerator
compartment.
To r einstall, reverse the removal proce-
dure. Be sure the shelf is in a level posi-
tion.When the sliding shelf is pushed to
the rear, the rear latches will reposition
to their correct operating position.
NOTE: To remove the entire compart-
ment assembly surrounding the Climate-
Zone™ drawers, refer to page 19.
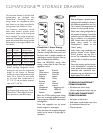
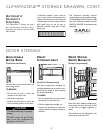
A LA CARTE
STORAGE DRAWER
TO REMOVE:
• Pull the drawer out until it stops.
• Tilt the drawer up and pull it out.
TO REINSTALL:
• Slide the empty drawer bracket back
on the track until the bracket tab slips
under the track “catch.”
• Hold on to the lower bar support.
• Tilt the drawer front up, slide the
drawer back into place (until the bar
rests in the slot at the bottom front of
the drawer).
• Close the drawer.
TO REMOVE THE STORAGE
DRAWER FRAME:
• Remove drawer.
• Lift up the rear of the frame slightly.
• Pull the frame straight out.
TO MOVE THE DRAWER FRAME
TO ANOTHER POSITION:
• Insert the rear hooks into the desired
openings.
• Let the frame settle into place.
• Be sure the frame is level and securely
locked at the rear before putting the
drawer back in.
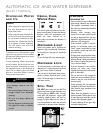
ELEVATOR™ SHELF
The Elevator™ shelf can be adjusted up
or down without being unloaded.
To adjust the height, pull out the knob on
the handle built into the shelf front. Turn
the handle clockwise to raise the shelf and
counterclockwise to lower the height of
the shelf.
TO REMOVE SHELF FOR
OCCASIONAL CLEANING:
• Completely unload the shelf.
• Partially slide the shelf out.
• Push up the
tabs under the
outside edges
of the shelf
behind the
front bracket and continue pulling the
shelf out, until it clears frame.
TO REINSTALL:
• Align the shelf into the guides on the
frame.
• Push the shelf all the way back. (It is
not necessary to push up the tabs for
reinstallation).
In ordinary use, the Elevator™ shelf
frame assembly does NOT require
removal.
In the unlikely event that the assembly
needs to be removed, it is important to
follow the correct removal procedure.
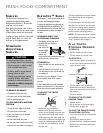
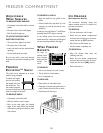
FRESH FOOD COMPARTMENT
SHELVES
The Fresh Food Compartment is
equipped with Standard Adjustable
Shelves and/or Elevator™ Shelves (fea-
tures may vary by model).
Both shelf styles feature a spill retainer
edge.They also slide out for easier access
to items stored at the rear of the shelf.
To slide out, grasp the front of the shelf
and pull. Gently push in to return the
shelf back to its original position.
STANDARD
ADJUSTABLE
SHELVES
TO REMOVE OR ADJUST:
• Completely unload the shelf.
• Lift up the rear of the shelf slightly.
• Pull the shelf straight out.
TO LOCK SHELF INTO ANOTHER
POSITION:
• Tilt up the front edge of the shelf.
• Lift up the rear of the shelf.
• Insert the hooks into the desired
frame openings.
• Let the shelf settle into place.
• Be sure the shelf is level and securely
locked at the rear before reloading it.
To avoid personal injury or prop-
erty damage, observe the following:
•Never attempt to adjust a shelf
that is loaded with food.
• Confirm shelf is secure before
placing items on shelf.
• Handle tempered glass shelves
carefully. Shelves may break
suddenly if nicked, scratched, or
exposed to sudden tempera-
ture change.
CAUTION