


MAINTENANt;E
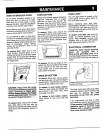
OVEN OR BROILER DOOR OVEN BO'I'I'OM OVEN LIGHT
Do not place excessive weight on an Protectoven bottomagainst excessive The oven light switchis located on the
open oven door or stand on an open spillovers especially acid or sugary controlpanel. Push in rockerswitchto
oven door as, in some oases, it could spiltovers as they may discolor the turn oven_ighton and off,
damagethedoor, cause the appliance porcelain.Use the correctsize cooking
to tip overand possiblycauseinjury, utensilto avoidboitovers.Never place Before replacing oven light bulb,
cookwareor aluminum foil directlyon DISCONNECT POWER TO OVEN. Be
When openingoven door,allowsteam the oven bottom, sure bulband oven parts are cool. Do
andhotairto escapebeforereachingin nottouchahotbulbwitha dampclothas
oventocheck,addor removefood. To remove: When cool, remove the the bulbmay break.
ovenracks,Pushtheovenbottomtothe
Do not attempt to open or close door rear of the oven and lift up at front until To replace oven light: Use a dry pot
until door is completely seated on hinge thefronted_eofthecvenbottomclears holder, to prevent possible harm to
arms. Neverturnonoven unless dooris the oven front frame• Remove oven hands; very carefully remove bulb.
properlyin place. When baking, be sure bottom from oven. Replace with a 40 watt APPLIANCE
door is completely c(osed. Baking bulb. Reconnect power to the oven.
results will be affected if door is not
securely closed. ELECTRICAL CONNECTION
To remove door: Open door to the Appliances which require electrical
"stop" position (opened about 4 to 6 power are equipped with a
inches) and graspdoorwithbothhands three-prong grounding plug which
at each side. Do not use doorhandle to ..... - must be plugged directly intoa properly
lift door. Lift up evenly until door clears grounded three-hole 120 volt electrical
the hinge arms. outlet.
To replace: Fit the rear edge of oven
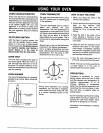
i_ bottominto the pin located at the center _
of the channel on the rear oven wall.
Push toward rear of oven and lower (_ _
oven bottom into place. )_2.._)
BROILER BOTTOM
To remove: When cool,removebroiler
pan and oven rack. Liftup front edge of
broilerbottom.Thenlift rearend up and 4 disconnectpower to app/iance
removebroilerbottomfrom oven, before servicing.
To replace 12-inch broiler bottom:
Place two slots along rear flange over The three-prong groundingplugoffers
two screws in rear wall. Then, lower protectionagainst shock hazards. Do
frontedge intoplace, not cut or remove the third
To replace 6-inch broiler bottom: grounding prong from the power
Push bottom to rear and lower into cord plug.
place.
To replace door: Grasp door at each If an ungrounded, two-hole or other
type electrical outletis encountered,it
side, align slots in the door with the
hingearmsandslidedoordownontothe is the personal responsibility of the
hingearms untilcompletelyseated on appliance owner to have the outlet
hinges, replaced with a properly grounded
three-hole electrical outlet.