


•All parts (except motor case) can be
removed for thorough cleaning. Wash
with a soft cloth or sponge and a mild
soap or a spray cleaner. Rinse and dry.
• Never use steel wool or scouring powder
on any part of the slicer.
• For easier cleaning, remove all parts in
order shown. Wash as directed. Replace
in reverse sequence.
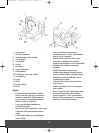
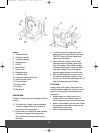
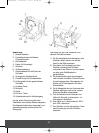
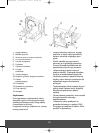
Motor case:
Press in the release button and remove the
motor case.
Food carriage: Slide food pusher off and lift
food carriage from platform.
Platform:
Fold up platform. Pull out the left hand side
of the platform from base first and then take
out the whole platform.
Stainless blade:
Unplug slicer. Turn blade lock counter
clockwise and lift out carefully. To replace,
align both tabs of blade lock with slots of
motor housing and turn clockwise to secure.
Be sure gears engage. Note: Always align
thickness guide with blade for safety and
blade protection during storage.
Non–slip feet:
Clean with any grease–removing cleaner,
such as alcohol or window cleaner.
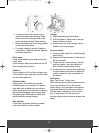
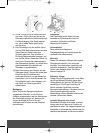
Storage:
1) Align thickness guide with blade.
2) Fold up platform. Wrap cord in storage
area on bottom of slicer.
3) Food pusher and food carriage can be
folded up for easy storage.
For best results:
1) To slice meats wafer thin, chill thoroughly
befor slicing.
2) Meats should be boneless. Fruits should
be free of seeds.
3) Foods with an uneven texture – like fish
and thin steaks – are often difficult to
slice. Partially freeze before slicing.
4) At canning time, use the slicer to quickly
cut cucumbers and onions for attractive
pickles, apples for pies, vegetables for
the freezer.
Hot Roasts:
Beef, Pork, Lamb, Turkey, Ham.
When slicing warm boneless roasts, remove
from oven and let set 15 to 20 minutes
before slicing. They will retain more natural
juices and slice evenly without crumbling.
Cut the roast, if necessary, to fit on food
tray. If roast is tied, turn off motor and
remove strings onte at a time as strings near
blade.
19
IM_646040 22/06/05 15:43 Side 19