


27
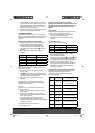
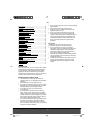
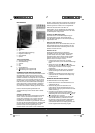
KEY TO THE MICROWAVE OVEN PARTS
1. Display
2. Control panel
3. Door
4. Dowels (safety lock)
5. Magnetron cover
6. Glass turntable
7. Spindle
Control panel keys:
a. Power (on/off)
b. Express
c. Defrost
d. Clock
e. Instant/start
f. Pause/Cancel
g.
Auto (up, select preset program)
h. Auto (down, select preset program)
PREPARING THE MICROWAVE OVEN
Each individual microwave oven is checked at the
factory, but for safety’s sake, after unpacking the oven,
you should check carefully that the microwave oven has
not been damaged during transport. Check whether
there is any visible damage (e.g. in the form of dents or
similar), if the door (3) closes properly, and if the hinges
are in order. If it appears that the microwave oven has
been damaged, you must contact the shop where you
bought it, and do not use it until it has been checked by
an authorised specialist.
Before using the microwave oven, you should check that
you have removed all packaging from it both inside and
outside.
Positioning the microwave
The microwave oven should be placed on a fl at surface,
with clearance of at least 10 cm at the rear, 5 cm at the
sides and 20 cm above to ensure suffi cient ventilation.
Do not remove the feet of the microwave oven. This oven
is designed to be free-standing. Always ensure the vent
holes on top of the cabinet are not covered. If they are
covered while the microwave oven is in use, there is a
risk of it overheating. The microwave oven cannot then
be used until it has cooled down.
Do not place the microwave oven or the cord near hot
areas, for example gas rings and electric hotplates.
Connecting the microwave oven
The microwave oven must be connected to a 230-volt
AC current, 50 Hz. The guarantee is not valid if the
microwave oven is connected to the wrong voltage.
Inserting the glass turntable
Before using the oven, ensure the glass turntable (6) is
seated on its spindle (7). It is not designed to be securely
held in place, but should be centrally positioned and
not come into contact with the sides of the oven during
cooking.
Setting the clock
When the oven is connected to the mains, an audible
beep will sound and “88:88” will fl ash three times on the
display (1). When a colon (:) starts to fl ash, the clock can
be set. Please note: Each time one of the microwave
oven keys is pressed, a beep is heard.
1. Press the Clock (d) key once. “0:00” will appear in
the display and the hour fi gure will fl ash.
2. Set the correct hour value using the Auto (g)
and Auto (h) keys. If a value is not entered within
approx. 5 seconds, the procedure will automatically
cancel.
3. Press the Clock key once more. The minute value will
fl ash, and can now be set.
4. Press the Clock key to fi nish the procedure or wait
approx. 5 seconds. The display then shows the time.
OPERATING THE MICROWAVE OVEN
The microwave oven is operated in the following way.
1. Place the food to be cooked in the oven and close
the door.
2. Select the cooking function and power and
preparation time, if relevant (described in “Cooking
Times” below). Start cooking by pressing the Instant/
Start (e) key.
3. The oven will start and the display will show
unelapsed cooking time. Use the Auto (g) and
Auto (h) keys to extend or shorten cooking time while
the oven is working.
4. Cooking can be interrupted at any time by pressing
the Pause/Cancel key (f). This can be done even
if using manual or express cooking, automatic
defrosting, preset programs or cooking with timer.
• One press temporarily interrupts cooking, two
presses permanently interrupts cooking.
• Cooking can also be temporarily interrupted by
opening the door (practical if the food needs turning).
• Cooking that has been temporarily interrupted can
be resumed by pressing the Instant/Start key.
5. Once the cooking time set has elapsed, the oven will
switch off automatically. The display will show “End”,
and 6 beeps will sound. 3 beeps will sound after 3
minutes if the Pause/Cancel key is pressed, or the
door is opened.
manual.indd 27manual.indd 27 08/04/05 11:14:4908/04/05 11:14:49