


8
Using your breadmaker
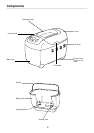
1 Take out the pan
Open the lid and remove the pan by lifting the
handle, pull firmly upwards. Place on the work
surface. It is important that the pan is filled with
ingredients outside the machine so that any
accidental spillage is not allowed to get into the
machine.
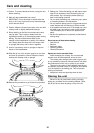
2 Attach the blades
Attach the kneading blades to the shaft by pushing
on.
3 Measure ingredients
Measure the ingredients required and add them all
into the pan in the order listed. See later section
‘Measuring your ingredients’).
• When adding the yeast to the baking pan, take care
that the yeast does not come into contact with the
water or any other liquid, as it will start to activate
immediately.
• Use tepid water 21-28˚C.
• If recipe calls for ingredients to be added like fruit
and nuts etc, add these at the indicated time (page
22) this reduces the chances of the added
ingredient being chopped.
4 Put pan back in
Place the baking pan back in the breadmaker,
press down firmly until it locks in place. You will
hear a click. Close the lid.
5 Plug in
Plug into the power supply. The breadmaker will
automatically be set to basic bread menu and normal
time.
•Everytime you press a button you will hear a beep to
confirm.
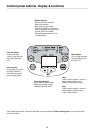
6 Select program
Choose the desired setting from the list by pressing
the Menu button.
7 Select weight
Press Loaf size button to choose between small or
large.
8 Select colour
Choose desired crust colour by pressing Colour
button. This is also used to select rapid setting.
9 Select the delay time
If you wish the bread to be ready later, set the time
delay now, as described in next section.
10 Start
Press the Start Stop button to start the machine. The
remaining time will count down in one minute
increments.
11
Progress
The breadmaker will automatically proceed through the
programmed stages as shown in the ‘Baking cycle
times’ section.
• It is possible that steam will escape through the vents
during baking, this is normal.
12 Finish
When the program is completed
and the bread is
baked
the display shows 0:00 and the beeper will
sound. The display then defaults back to program time.
13 Keep warm
The keep warm function will circulate hot air for a
further 60 minutes on most settings (see ‘Baking
cycle times’ section). For best results, remove the
baking pan and loaf within this period or when the
initial program is completed. Beeps will be heard
when the keep warm period is finished.
Press STOP to end this keep warm process.
14 Remove the food
Press Stop. Open the lid.
WARNING: Use oven gloves when removing the
baking pan (taking care as it is very hot).
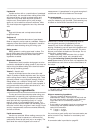
15 Turn out the bread
Allow the bread to cool in the pan for 5-10 minutes,
then turn the pan upside down and tap the bread
from the pan onto a rack to cool. If the blade
remains in the pan, fill the pan with warm water to
loosen the blade and prevent it from sticking to the
shaft.
• The kneading blades normally stays in the loaf. Wait
until the loaf is cool and then remove the blade with
a wooden or plastic utensil to avoid damage to the
non-stick surface.
16 Always press STOP and unplug the appliance after
use.
• Do not open the lid whilst the breadmaker is
operating as this will affect the quality of the
bread, especially its ability to rise properly.
Only open the lid when the recipe needs you to
add additional ingredients, see recipes
Room temperature note
The breadmaker will work well in a wide range of
temperatures, but there could be a difference in loaf
size between a very warm room and a very cold room.
We recommend the room temperature should be
between 15˚C and 30˚C.