


Owner’s Manual 9
Ice Maker (Optional)
The ice maker is assembled to the refrigerators at the factory as
optional equipment. If the refrigerator does not have a factory
installed ice maker, one cannot be added to the refrigerator at a
later time.
The ice maker is fully automatic and will operate in ambient
temperatures as low as 0° F. To allow operation at tempera-
tures between 0° F and 32° F., the ice maker has a heater on
the solenoid water valve and on the water line between the
solenoid valve and the ice maker. At temperatures below 0° F,
store the ice maker as written in the “Ice Maker Storage” section
of this manual.
CAUTION: The water line heater does not protect the
water supply line from the vehicle shut off valve to the
solenoid valve on the back of the refrigerator.
When the freezer temperature of the refrigerator is low enough,
the ice maker opens the water solenoid valve and fills the mold.
The ice maker ejects the frozen ice into a storage bin. As the
storage bin fills, the ice raises the shut-off arm until it turns off
the ice maker. As you use the ice and lower the ice level in the
storage bin, the shut-off arm also lowers. This turns the ice
maker ON and begins the process of making ice.
The ice maker operates on:
- Cold potable water at a pressure of 15 psi - 125 psi.
- 120 Volts AC (108 VAC min. - 132 VAC max.).
Ice maker operation:
1. Make sure the ice maker AC power cord is plugged into a
receptacle.
2. Open the water shut off valve of the vehicle.
NOTE: Make sure that the ice maker arm can move freely and
does not touch the frozen foods in the freezer.
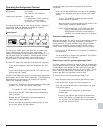
3. Push the ice maker arm down to the ON position [60] (See
Art01015).
CAUTION: If you operate the refrigerator without
connecting the water supply line and/or opening the
water shut off valve of the vehicle, make sure the ice
maker arm is up in the OFF position.
4. Allow the freezer to cool enough and ice production will begin
to fill the storage bin [61].
NOTE: New plumbing connections and/or impurities in the
water supply line after winterizing can cause the first
ice to be discolored or have an odd flavor.
5. To stop the ice maker, push the ice maker arm up to the OFF
position [62].
Refrigerator Care Checklist
Your refrigerator will give you years of trouble free service if you
do these simple checks every three to six months:
- Keep the food compartment and the freezer clean. See
“Cleaning”.
- Defrost the refrigerator as necessary. See “Defrosting”.
- Make sure the door seals correctly. See “Door Sealing“.
- Be aware of any cooling changes that are not because of
weather, loading, or gas control changes. If changes occur,
contact your dealer or service center.
- Make sure the gas supply is propane gas only and not
butane or a butane mixture.
- When in propane gas operation, examine the appearance
of the flame. See “Gas Flame Appearance”.
- Make sure the air flow in the lower intake vent, through the
refrigerator coils and condenser, and out the upper exhaust
vent is not blocked or decreased.
- Make sure the area behind the refrigerator is clear. Do not
use the area behind the refrigerator for storage of anything,
especially combustible materials, especially gasoline and
other flammable vapors and liquids.
!
!
Defrosting
The cooling fins of the refrigerator operate at below freezing
temperature and will naturally form frost from humidity, which is
always present in the air. The humidity inside the refrigerator
increases:
- with higher outside temperature and humidity.
- with the storage of non-sealed fresh foods or warm foods.
- with the amount of time that the door(s) are open.
- with any air leakage into the refrigerator.
Although the refrigerator is not frost -free, it is made to limit frost
on the cooling fins. At regular intervals, the temperature control
system automatically melts most of the frost from the cooling
fins. The water from the cooling fins drains into a collection cup
that is attached to the back of the refrigerator. The heat of the
cooling system evaporates the water from the collection cup.