


Installation Manual 6
You can change enclosures that were made for Norcold model
N8XX refrigerators so that you can put Norcold model 120X
refrigerators into them.
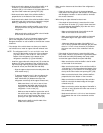
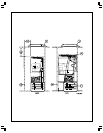
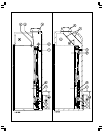
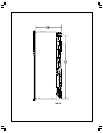
To change the Norcold model N8XX refrigerator enclosure [23]
into the Norcold model 120X refrigerator enclosure [24] (See
Art01597):
- Increase the height of the enclosure by 3 3/8 inches [25].
- Increase the width of the enclosure by 8 13/16 inches [26].
- Make sure to add the additional width to the left side of the
enclosure (as looking at the rear of the refrigerator).
Install the necessary baffles only as written in the “Install the
Upper and Lower Vents” section of this manual.
The locations of the 12 VDC supply, the 120 VAC supply, and the
propane gas supply line do not change.
Optional Installation
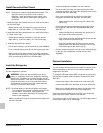
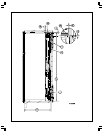
- Push the refrigerator completely into the enclosure.
- Put the screws [1] through the upper and then the lower
mounting bracket on the front of the refrigerator and into the
enclosure wall (See Art01106).
- Put a corner trim piece [3] on each front corner of the
refrigerator (See Art01106, Art01584, and Art01585).
- Make sure that each corner trim piece is behind the
side trim [4].
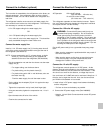
- Put the top and bottom trim pieces [5] against the front of
the refrigerator (See Art01106, Art01585, Art01586, and
Art01587).
- Make sure that the top and bottom trim pieces are on
top of each of the corner trim piece.
- Put the edge of the top and bottom trim pieces over the
edge of the aluminum extrusion [6].
- Push the Y-shaped edge of each trim piece over the
opposite side of the aluminum extrusion until it locks
into position against the vehicle wall [7].
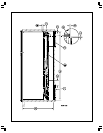
- Put two screws through the holes [4] in the mounting flange
on the rear of the refrigerator and into the floor (See
Art00996).
Put the refrigerator in position:
WARNING: Make sure the combustion seal is not
broken, is completely around the refrigerator mounting
flanges, and is between the mounting flanges and the
wall of the enclosure If the seal is not complete, exhaust
fumes can be present in the living area of the vehicle.
The breathing of exhaust fumes can cause dizziness,
nausea, or in extreme cases, death.
NOTE: Be careful when you put the refrigerator into position.
The refrigerator has vacuum insulating panels on the
top and sides. If punctured, these panels lose
insulation value which decreases the cooling perfor-
mance of the refrigerator.
- Make sure that the flue cap is not pushed down against the
top of the flue tube.
Install the Refrigerator
NOTE: The doors are made to accept decorative panels. The
decorative panels must be 3/16 inch or less in
thickness. Install the decorative door panels in the
refrigerator doors before installing the refrigerator in
the vehicle.
1. Make two upper door panels that are 16 13/64 inches wide x
18 3/8 inches high:
- Raised panels must be centered on each door and no
larger than 15 11/32 inchs wide x 17 17/32 inches high.
2. Make two lower door panels that are 16 13/64 inches wide x
41 13/64 inches high:
- Raised panels must be centered on each door and no
larger than 15 11/32 inchs wide x 40 11/32 inches high.
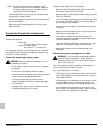
3. Install the decorative door panels:
- Pull the panel retainer [1] off of each door [3] (See Art00965).
- Push a decorative door panel [2] into the slots of each door.
- Make sure that each panel retainer is correctly positioned
and push the curved snap [4] of the panel retainer [5] inside
of the curved snap [6] of the door (See Art01590).
Install Decorative Door Panels