


Installation Manual 7
Connect the Ice Maker (optional)
The ice maker is assembled to the refrigerators at the factory as
optional equipment. If the refrigerator does not have a factory
installed ice maker, one can not be added to the refrigerator at a
later time.
The refrigerator installer must connect a cold water supply line
to the solenoid valve at the rear of the refrigerator. The following
are necessary to connect the icemaker:
- 1/4 in. OD copper tubing for the water supply line.
OR
- 1/4 in. OD plastic tubing for the water supply line.
- 1/4 in. shut off valve in the water supply line. This should be
easily accessible through the lower intake vent.
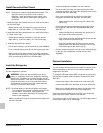
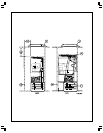
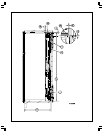
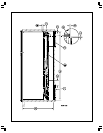
Connect the water supply line:
Install a 1/4 in. OD water supply line [1] from the water shut off
valve of the vehicle to the solenoid water valve [2] at the rear of
the refrigerator (See Art01014):
NOTE: A brass compression nut [1], a brass sleeve, a plastic
sleeve [2] , and a brass insert [3] are supplied and
attached to the rear of the refrigerator (See Art01604).
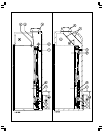
- Put the compression nut and then the sleeve onto the water
supply line [4].
- For copper tubing, use the brass sleeve.
- For plastic tubing, use the plastic sleeve [2].
- For plastic tubing with .040 in. wall thickness, also use
the brass insert [3].
- Flush the water supply line until the water is clear.
- Put the tubing into the adapter [5] until it is against the stop
of the adapter.
- Tighten the compression nut by hand (hard finger tight).
- Using two wrenches, tighten the compression nut 1 ½ to 2
turns.
- Open the water shut off valve of the vehicle.
- Examine the connections for leaks.
Connect the Electrical Components
AC Operation 120 volts AC voltage
(132 volts max. - 108 volts min.)
12 volts DC control voltage
(15.4 volts max. - 10.5 volts min.)
This refrigerator operates on these electrical sources. Opera-
tion out of these limits may damage the refrigerator’s electrical
circuit parts and will void the warranty.
Connect the 120 volts AC supply:
WARNING: Connect the AC power cord(s) only to a
grounded three-prong receptacle. Do not remove the
round ground prong from the AC power cord of the
refrigerator or the ice maker (optional). Do not use a two
prong adapter or an extension cord with either AC power
cord. Operation of the refrigerator without correct ground
can cause dangerous electrical shock or death if you are
touching the metal parts of the refrigerator.
Put the AC power cord(s) into a grounded three-prong recep-
tacle:
- Make sure the receptacle is positioned within easy reach of
the lower intake vent.
- Make sure the power cord(s) does not touch the burner
cover, the flue pipe, or any hot component that could
damage the insulation of the power cord.
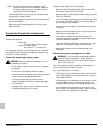
Connect the 12 volts DC supply:
The refrigerator controls operate on 12 VDC power. As the
distance from the vehicle battery to the refrigerator increases,
the correct AWG wire size and fuse size also increases. If the
wire size is too small for the distance, a voltage drop occurs.
Use a minimum of 18 AWG wire and a maximum 6 Amp fuse. If
the wire size is larger than the min. size, use the correct fuse
per RVIA A119.2 standard or local codes.
1. Install a fuse in DC power supply wires between the battery
and the refrigerator:
- Put fuse as close to the battery as possible.
2. Connect the DC power supply wires (See Art00966):
- Attach a 1/4 inch Quick Connect terminal to each DC power
supply wire.