


www.oster.com
6
www.oster.com
7
HOW TO:
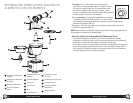
Using Your Food Processor
NOTE: Do not attempt to chop ice in this food processor; it will damage the bowl
and dull the Chopping Blade. This unit will not whip cream, beat egg whites,
grind coffee beans, spices or other items with high oil content, or slice or shred
hard-cooked eggs, marshmallows, or soft cheeses.
Important: For your protection, this unit has an interlock system. The processor
will not operate unless the bowl is properly locked onto the base and cover is
properly locked onto the bowl. Do not attempt to operate the unit without the
bowl lid, bowl and food chute lid correctly in place. Be sure base is on a flat, dry
and clean surface before you begin processing.
NOTE: Before you begin, PLEASE BE SURE THAT THE ELECTRIC CORD IS UNPLUGGED.
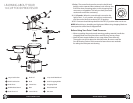
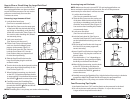
How To Assemble the Large Bowl
Align the base and bowl as illustrated in
Figure 1. Align the bowl handle with the
UNLOCK
mark on the base. Turn the bowl
counter-clockwise until it clicks onto the base.
The bowl handle should now align with the
LOCK mark on the base. (The bowl handle
will be positioned above the control buttons).
NOTE: There is only one position for the bowl
to lock onto the base. The unit will not operate
if the bowl does not lock onto the base.
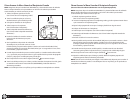
How to Lock the Cover
Place the cover onto the bowl. Align the
UNLOCK
mark on the cover and the UNLOCK
mark on the bowl (as illustrated in Figure 2).
Twist the cover counter-clockwise towards the
LOCK until it clicks onto the bowl. The LOCK
mark on the cover should now align with the
LOCK mark on the bowl.
NOTE: When the cover is locked into position,
the safety mechanism on the cover and bowl
will align. The unit will not operate if the cover is not locked onto the bowl.
NOTE: BOWL MUST BE LOCKED INTO BASE BEFORE COVER CAN BE LOCKED INTO
POSITION.
Figure 1
LOCK
UNLOCK
Figure 2
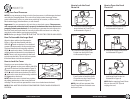
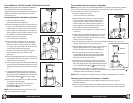
How to Lock the Food
Chute Lid
How to Open the Food
Chute Lid
Food Chute Lid
1 The Food Chute lid hinges
onto the back of Food Chute.
As illustrated in Figure 3.
2 Pull up the Large Food Pusher.
As illustrated in Figure 7.
3 Pull back the food chute lid
and Large Food Pusher. As
illustrated in Figure 8.
NOTE: Before opening Food Chute
lid, turn the unit OFF (O) and
unplug the cord.
Figure 3
Figure 7
Figure 8
2 Push down the Large Food
Pusher into the Food Chute.
As illustrated in Figure 4.
Figure 4
3 Push down on the tab of Large
Food Pusher to latch the Food
Chute lid onto the Food Chute.
As illustrated in Figure 5.
NOTE: Unit will not operate if the
Food Chute lid does not latch onto
the Food Chute
Figure 5
1 Pull Side Release button out.
As illustrated in Figure 6.
Figure 6