


English-4 English-5
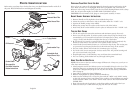
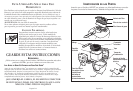
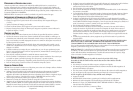
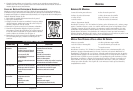
pa r T S iD e n T i F i C aT i o n
Before using your Deep Fryer for the first time, you should become familiar with all of
the parts. Read all Instructions and Safeguards carefully.
pr e p a r i n g Yo U r De ep Fr Y e r Fo r US e
Prior to first use, remove all packaging materials from the exterior and interior of the
fryer. Make sure the fryer is unplugged. Wash the Frying Basket and removable Oil
Reservoir in hot soapy water. Gently wipe the Cool-Zone Heating Element with a damp
cloth. Dry all parts thoroughly. See CARE AND CLEANING section.
CAUTION: Do not immerse cord, plugs or control panel assembly in water.
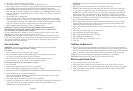
Ba S K e T Ha n D l e aS S e M B l Y in S T r U C T i o n S
1. Remove Handle and Frying Basket from inside the deep fryer.
2. Notice the eyelets on the interior side of the basket under the “ LOCK ” tab.
3. Squeeze the handle prongs in the middle
4. Release the prongs into the eyelets on the interior side of the basket.
5. Press firmly down on the handle to lock in place as indicated on the “ LOCK ” tab.
Ti p S F o r De e p Fr Y i n g
• Filltheunitwithoilbetweenthemaximumandminimumcapacitylinesonly.
• Donotoverfillthebasket.Toachievequalityresultsdeepfryingfoodneedstobe
surrounded by oil. Too much food causes the oil temperature to drop, resulting in
“soggy” food. Food should be no higher than the top of the basket.
• Besurethatallicecrystalsareremovedfromthefoodandfoodiscompletelydry.
Excessive water and ice can cause the oil to splatter and/or overflow.
• Coatedfoods(breadcrumbs,batters,etc.)arebestfordeepfrying.Thecoatingacts
as a protective layer keeping food moist on the inside and crisp on the outside.
• Forbestresults,defrostfrozenfoodsfor20minutespriortofrying.
• Fryfoodsatthecorrecttemperatureforbestresults.Thiswillpreventburningand
give you even colored, crispy food.
• Prepackagedfrozen,cookedchicken,maycookfasterthanuncookedfood.
• Forevencooking,shakebaskethalfwaythroughcookingtime.
US i n g Yo U r oS T e r De e p Fr Y e r
NOTE: Never turn on the fryer with an empty Oil Reservoir. Always use your fryer on
a flat, heat resistant surface.
• AttachmagneticendofSureReleasepowercordassemblydirectlytothefryer.This
should be done prior to plugging the cord into the wall outlet. The magnetic end
of the cord is designed only to go on one way. Be sure the side stating “THIS SIDE
UP”is facing up.
• OpenLidbypressingtheOpenLidButton.
• RemoveFryingBasketbypullingtheBasketHandleup.
• MakesuretheOilReservoirisseatedinplacewiththe“MIN”and“MAX”marks
on the side opposite of the Control Panel. Pour cooking oil into Oil Reservoir until it
reachesbetween“MIN”and“MAX”marksinsidereservoir.DONOTOVEROR
UNDER FILL.
• PlaceLidontotheunitbyplacingitonthehingeguidesatthebackofthefryer.
• MakesurethatfryerisOFFandinsertpluginto120voltACoutlet.
Time
Temperature
Time
Temperature
Filter Cover
Charcoal Odor Filter
White Grease Filter
Handle
Oil Reservoir
Control Panel
See page 9 for
Over Heat Protection
Button instructions
Housing
Power Cord
Frying Basket
Lid
Condensation Trap
Detachable Cord
Mount/Power Strip