


English-6 English-7
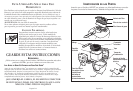
• Turnfryertodesiredtemperatureposition.
• TurnTimerknobto“ON”position.PowerLightwillturnon.
• Readylightwillturnonwhenoilispre-heated.PresstheOpenLidbuttonandplace
Frying Basket onto basket hook inside Oil Reservoir behind Control Panel.
• PlacefoodinsideFryingBasket(Donotoverstackfood).PlaceLidbackontothe
unit and close. Lower Frying Basket into Oil Reservoir. CAUTION: Always replace
and close Lid before immersing food in oil. Do not immerse or drain food with Lid
removed or open.
• Turntimerknobtodesiredtime.
• Aftertimeisupabellwithsound.LiftFryingBasketandhangbasketontobasket
hook in Oil Reservoir. To remove excess grease and retain crispness, let food drain
in Frying Basket at least 10-20 seconds. Open Lid, then lift Frying Basket by handle
and pour contents onto plate covered with paper towels before serving.
• Whenfinishedcooking,makesurefryerisinOFFposition.
WARNING: DO NOT USE SURE RELEASE POWER CORD SYSTEM TO
DISCONNECT THE FRYER. ALWAYS DISCONNECT PLUG FROM WALL
OUTLET FIRST TO DISCONNECT FRYER.
Use only Model #PL1215 magnetic cord set with this product. The use of any other
magnetic cord set may cause fire, electric shock, or injury.
CAUTION: The Sure Release Power Cord is only for accidental disconnection and
is not to be removed during normal operation. If the cord becomes disconnected, the
user should immediately unplug the cord set from the wall outlet, then reconnect
the magnetic cord to the deep fryer.
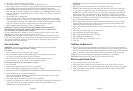
Ca r e a n D Cl e a n i n g
WARNING: Always turn control to OFF then disconnect plug from wall outlet
BEFORE disconnecting BREAK AWAY CORD.
CAUTION:
• Donotimmersecordsetsinwateroranyliquids
• DonotattempttodefeatthedetachablemagneticSureReleaseCordsystem
by trying to permanently attach cord set to product.
• Donotstickpinsorothersharpobjectsinholesonmagneticcordset.
• Donotuseanytypeofsteelwooltocleanmagneticcontacts.
NOTE: Make sure fryer has cooled before cleaning.
• TurnunitOFF.
• Unplugfromoutletandallowunittocoolcompletely.
• RemoveSureReleasemagneticcordfromthefryersocket.
• RemovetheLid.(SeeTOREMOVEANDREPLACELIDfordetailedinstructions)
• OpentheFilterCoverandremovetheFilters.
• RemoveFryingBasket.WashtheFryingBasketinthedishwasherwithhotsoapy
water. Rinse and towel dry carefully.
• LiftControlPanelAssemblyupfromthefrontofthefryer.
• CarefullyliftOilReservoirstraightupoutoftheexteriorhousingbyholdingtherim
of the bowl. Store in an airtight container. See Tips for Oil Use and Storage.
Oil Reservoir is also dishwasher safe.
WARNING: Do not remove Oil Reservoir until the unit has cooled and is
unplugged.
• Removepowerstripfromtheinteriorofthebackofthefryer.
NOTE: Control Panel must be removed before the Power Strip can be removed.
• AremovableCondensationTrapislocatedonthetoprearofthefryerhousing.
NOTE: This trap will collect any water that has been condensed on the inside of
the Lid when the Lid is opened after frying. Remember to empty and clean the
Condensation Trap after each use. To clean simply rinse with warm water and dry.
• TheBasket,Lid,OilReservoir,HousingandCondensationTraparedishwashersafe.
Dry all parts thoroughly after cleaning.
• TheControlPanelandPowerStripshouldneverbeimmersedinwaterorother
liquids. Gently clean the outer surface of the Control Panel with a damp cloth
containing mild soap solution or plain water.
• EnsurethatboththeLidandOilReservoirarecompletelydryafterwashingand
before use.
• InsertthePowerStripbackintofryerHousing.
• InsertOilReservoirbackintohousing.
• InsertControlPanelintofrontoftheunit.
• PlaceBasketintoOilReservoir.
• PutFiltersbackintoLidandputCoveron.
• Closelid.
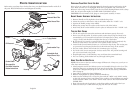
To re M o v e a n D re p l a C e liD
• ToremoveLid,pressOpenLidButtonandliftLidtoaverticalposition.Remove
Lid by pulling firmly upwards. Reverse the sequence to secure Lid from the vertical
position to secure back in place. When replacing the Lid, the spring on the Lid must
be inserted down in front of the metal clip that is located on the fryer housing.
NOTE: Always remove Lid before emptying the Oil Reservoir or cleaning.
CAUTION: Ensure that Lid is in place prior to operation of unit.
re p l a C i n g a n D Cl e a n i n g Fi l Te r S
• OpentheFilterCover,andremovefilters.
• FoamwhiteGreaseFiltermaybewashedinhotsoapywater.Allowtoairdry.
• Cleantheinsideofthecoverwithadampsoapysponge.Rinseanddrythoroughly.
• PlacecleanWhiteGreaseFilteronLid,followedbyBlackCharcoalOdorFilter,
then replace Filter Cover.