


in t r o d u c t i o n
co n d i t i o n i n g o F t H e no n -St i c k co at e d pa n
Before using your new appliance, wash the inside of the pan with warm, sudsy
water and dry. When washing the skillet, make sure the temperature controller
is removed. Rub a film of cooking or salad oil all over the non-stick coating on
the inside of the pan. Remove any excess oil with a cloth or paper towel.
The OSTER
®
Electric Skillet is now ready for use and it is unnecessary to
condition it again.
uS i n g t H e Hi n g e d lid el e c t r i c Sk i l l e t
1. Push the temperature controller firmly into its socket found at the side of
the appliance. Plug into a standard 120 Volt AC outlet.
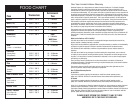
2. Set the temperature you want by turning the knob on the temperature
controller. The indicator light will come on. Set the temperature of your
choice opposite the indicator light. When the light goes off, the chosen
cooking temperature has been reached. During cooking, the light will cycle
on and off indicating the temperature is being maintained. Guidance in the
choice of temperatures is supplied later in this book.
3. It is recommended that you do not cook with the Hinged Lid Electric Skillet
standing on temperature sensitive surfaces.
4. For simmering, set the temperature control knob to 300°F/150°C or
SIMMER and wait until the liquid boils. Turn the knob toward the WARM
setting. Set the dial to this point each time SIMMER is specified in a recipe.
5. Do not use metal utensils in your Hinged Lid Electric Skillet as they may
damage the non-stick coating. Wood or plastic coated spatulas are best. If
you use plastic tools, make sure they are suitable for use on hot surfaces.
6. To remove the temperature controller, first unplug from the wall outlet
and pull out.
cl e a n i n g t H e ap p l i a n c e
Switch off, remove plug from wall outlet and remove the temperature control
probe. Allow the appliance to cool. Wash the pan and lid with hot sudsy
water. You can totally immerse the pan or place in the dishwasher. The lid
is also dishwasher-safe providing it is placed in the TOP RACK ONLY. DO
NOT PLACE LID UPSIDE DOWN IN BOTTOM DISHWASHER RACK.
To remove stubborn food residues, use a nylon scourer. NEVER use abrasive
powder cleaners or metal scouring pads because these will damage the non-
stick coating. After washing, dry the pan thoroughly, while paying particular
attention to the electrical socket and pins. DO NOT USE METAL PADS
TO CLEAN ELECTRICAL PINS. Wipe controller with damp cloth. Do not
immerse cord or controller in water.
St o r a g e a n d ma i n t e n a n c e
Unplug cord and remove temperature control probe. Allow appliance to cool
before storing. Store your Hinged Lid Electric Skillet in a dry location, such as
on a tabletop or countertop, or on a cupboard shelf. Wind the electrical cord
into a loose coil and secure with a plastic twist fastener. For convenience, the
temperature control probe and cord can then be stored inside the skillet.
Other than recommended cleaning, no further user maintenance should
be necessary.
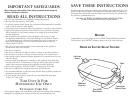
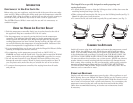
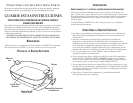
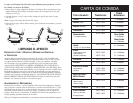
The hinged lid was specially designed to make preparing and
serving food easier.
• To attach the lid, be sure to align the lid hinge so that it slides down onto the
matching heating base hinge. (see Fig. 1).
• When raising and lowering the lid, always use the lid lifting handle (see Fig. 2).
Note: Lid opens away from the steam.
• To remove the lid, use both hands to gently lift up and remove. (see Fig. 3).
Fig. 1 Fig. 2 Fig. 3