


Min
www.oster.com
www.oster.com
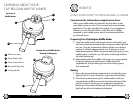
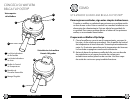
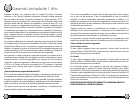
LEARNING ABOUT YOUR
FLIP BELGIAN WAFFLE MAKER
4
5
a
Red Power Light
Green Ready Light
Temp. Control Knob
Removable Drip Tray
Folding Handle
b
c
d
e
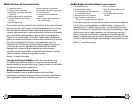
HOW TO:
USING YOUR OSTER® FLIP BELGIAN WAFFLE MAKER
For best results, follow these simple instructions.
When your wae maker is heated for the rst time, it may
emit slight smoke or odor. This is normal with many heating
appliances. This does not aect the safety of your appliance.
However, it may aect the avor of the rst set of waes
prepared in your wae maker, and it is recommended that
you discard these.
Preparing Your Flip Belgian Wae Maker
1 Close the wae maker and plug it into the wall outlet, you
will notice that the red power light and green ready light will
turn on. Turn the temperature control knob to the desired
setting. It will take approximately 5 to 8 minutes to reach
baking temperature. When the green ready light goes on, the
wae maker is ready for use. The green ready light will turn
o while heating up.
2 Before baking the rst waes of the day, use a pastry brush
to lightly coat the top and bottom wae grids with
vegetable oil. A light coating of non-stick cooking spray
also works well.
Baking
1 When the proper baking temperature is reached, the green
light will go on. Once heated up, cycle times will be faster.
2 Pour batter onto bottom grid of wae maker. Ladle just
enough batter to ll lower grid so that the peak area of the
grid is covered. If necessary, use a spatula to spread the
batter in to the corners of the grid. At this point the green
light will go o as the baking cycle begins.
Top View of
Wae Maker
c
a
b
d
Bottom View of Wae Maker
Rotated 180 Degrees
e
e
b