


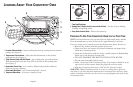
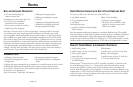

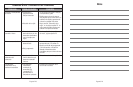

Figure 1 Figure 2 Figure 3
English-4 English-5
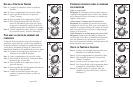
Le A r n i n g Ab o u T Yo u r Co u n T e r T o p oV e n
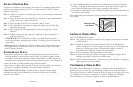
1. Function Selector Knob – Select cooking function by turning knob to desired
setting. (See Figure 1)
2. Temperature Control Knob – Adjust the dial thermostat to the desired
temperature. (See Figure 2)
3. Timer Control Knob with Bell Signal – Set cooking time up to 60 minutes.
Will automatically turn the oven OFF at the end of the cooking time.
(See Figure 3)
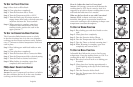
4. Removable Crumb Tray – For crumb or fallen food particles collection.
Pulls out for easy cleaning.
5. Removable Wire Rack – See “Positioning Rack” section.
6. Tempered Glass Door – For front viewing of food.
7. Two Rack Positions
8. Baking Pan & Cookie sheet in one and Broil Rack – Use for all your baking,
broiling and grilling needs.
9. Easy Clean Interior Walls – Allows fast clean up.
pr epA ri ng To uSe Yo ur Co un T erT o p oV en f o r T he fir ST Ti m e
NOTE: During initial start up you may detect a slight smell and/or smoke.
Turn the temperature to max and let run for approximately 5 minutes.
If you are using your Countertop oven for the first time, please be sure to:
• Remove any stickers from the surface of the oven.
• Open oven door and remove all printed documents and paper from
inside the Countertop Oven.
• Clean the rack and pan with hot water, a small amount of dishwashing
liquid and a non-abrasive cleaning pad.
• DO NOT IMMERSE THE BODY OF THE UNIT IN WATER.
• Dry the unit thoroughly before using.
• Select a location for the Countertop Oven. The location should be in an
open area on a flat counter where the plug will reach an outlet.
• Plug the Countertop Oven into a 120 Volt AC electrical outlet.
WARNING: When Countertop Oven is in use or cooling down, please be
sure there is a 6-inch clearance between the Countertop Oven and any other
surface including cords. Be sure the cord is not resting against the back of the
Countertop Oven.
1
8
4
2
3
5
6
7
9