INSTALLATION
12 L20-331, rev.02 (08/11)
1.9.5. MAIN BURNER SYSTEM ADJUSTMENT
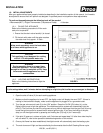
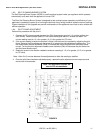
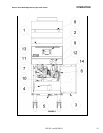
For the main burners to operate the manual gas supply valve (1, Figure 2) must be open, the gas valve control
knob (5, Figure 2) must be on, and the appliance must be turned on by the digital control (4, Figure 1). The main
burners receive gas from the main gas supply through the thermostatically controlled gas valve. When the water
temperature drops below the preset temperature the gas control valve opens.
The main burners must be adjusted to the nominal burner pressure to deliver optimum flame. Refer to the
following procedure to adjust the main burners.
1. Ensure that the shut off valve (1,Figure 2) is shut off, remove the steel plug from the manifold pressure tap
(7, Figure 2) and connect an accurate pressure gauge (range of 0-16 “W.C. (39.85 mbar, 3.98 kPa) in 0.1”
(.25 mbar, .02 kPa) increments) or manometer.
2. Open the shut off valve, turn on the appliance and all other appliances connected to the gas supply line and
light their main burners. The pressure reading should be taken when all the appliances main burners are
operating. The pressure reading of the appliance should not drop from the nominal burner pressure. Any loss
of pressure indicates inadequate supply line installation, which will cause poor performance of all appliances
during peak usage. The main gas supply pressure should only be checked by an authorized professional.
3. The pressure reading of the appliance should be within ±0.1” W.C. (.25 mbar, .02 kPa) of the nominal
pressure setting marked on the data plate located on the inside of the appliance door. If the pressure is
correct, go to step 6, if the pressure needs to be adjusted, continue to step 4.
4. To adjust the pressure, remove the cap on the regulator adjustment screw (3) and, with a flat head
screwdriver, adjust the regulator screw until the proper burner pressure is reached. Turning the screw
clockwise (CW) will increase the burner pressure. Turning the screw counterclockwise (CCW) will decrease
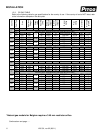
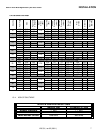
the burner pressure. Refer to the gas table (s) in Sec. 1.5.3 & 1.5.4 of this manual.
5. When the pressure is correct, replace the cap for the regulator adjustment screw (3).
6. Turn off the ALL appliances, shut the main gas valve (1) to your Pitco appliance and remove the pressure
gauge. Apply pipe joint compound to the Plug for the manifold pressure tap (7), and replace it insuring that it
is tight and leak free. A soap and water solution can be used to check for leaks during normal operation.
7. No further adjustment is required. The burner system has been designed to operate at peak performance
with the optimum burner pressure, and the SCB system cleaning the main burners.


