


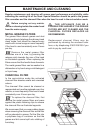
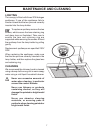

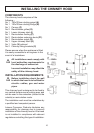


INSTALLING THE CHIMNEY HOOD
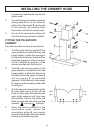
4. Drill the holes for the fixing screws
using an 8mm masonry drill bit. Insert
the rawl plugs and fix the brackets (2)
using the 4.2 x 44.4mm screws
provided.
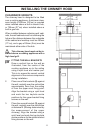
DRILLING THE HOLES 1
1. Draw a horizontal line through the
vertical 970mm up the wall from the top
of the cooking appliance, ensuring it is
level with a spirit level.
2. Mark the centres for the holes 1,
116mm either side of the vertical line.
3. Drill the two holes 1 for the fixing screws
using an 8mm masonry drill bit. Insert
the rawl plugs and the 4.2 x 44.4mm
screws provided. Tighten the screws,
leaving a space of 5-6mm between the
head and the wall.
Note: If the chimney hood is to be installed
onto a hollow construction plaster or
partition board wall then special fixing
screws will be required (not supplied).
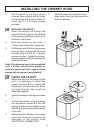
FIXING THE CANOPY
1. Before starting to fix the canopy to the
wall, it is necessary to adjust the
support brackets S1 by rotating the
adjustment screws clockwise about
half way through their length as
illustrated opposite.
2. Hook the canopy C onto the two screws
1.
3. To level the canopy on the wall rotate
the adjustment screws S1 until the
canopy is level and then tighten up the
wall fixing screws to secure the canopy
to the wall.
4. Before fitting the chimney to the canopy
make the electrical connection as
described in the section titled
‘ELECTRICAL CONNECTION’.
5. When the electrical connection has
been made, test the three speed fan
and the spotlams
12