


7
IV. Operation Procedure
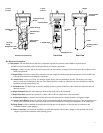
A. Pre-Operative Inspection
1. Inspect the outside diameter of the white element contained within the sample filter for any signs of red spots. The
appearance of red spots anywhere on the outside diameter of the element indicates that the filter requires replacement to
avoid fouling of the instrument.
2. Select the R12 or R134a sample hose as dictated by the application. Inspect the hose for cracks, signs of wear, obstruction
or fouling. DO NOT use any hose that has any sign of wear. Install the sample hose onto the sample inlet port of the
instrument by hand-threading the hose end onto the connector.
3. Inspect the air intake port and sample exhaust port to verify that they are not clogged or obstructed.
4. Inspect the port of the air conditioning system or storage from which the sample will be taken. Verify that the port will
emit vapor only and will not emit liquids or oil.
5. Install the Vehicle Battery Adapter or the Wall Power Adapter harness into the power connector of the instrument.
B. Operation Procedure
1. Power the instrument by connecting the power harness to the vehicle battery terminals or by plugging the wall power
adapter transformer into an appropriate wall outlet.
2. The instrument will begin a warm up period of 30-60 seconds.
3. During the warm up period the user will have the option to enter the local elevation above sea level into the instrument
memory. The instrument is sensitive to elevation changes of 500 feet (152 meters) and the local elevation must be entered
into the instrument memory upon initial use. Normal barometric variations will not affect the performance of the
instrument. Once the elevation has been entered it does not ever require entry again unless the instrument is moved to a
new elevation.
The screen “USAGE ELEVATION <<<NOT SET>>>“ is displayed during warm-up if the elevation has not been set.
Set the elevation to prevent the displaying of this screen during warm-up as directed below.
a) During the warm up period depress and hold the “A” and “B” pushbuttons simultaneously until the display reads
“USAGE ELEVATION, 400 FEET”. This is the factory setting of 400-feet (122-meters).
b) Use the “A” and “B” pushbuttons to adjust the elevation reading to the nearest 100-foot (30-meter) increment to the
local elevation. The “A” pushbutton will increase the elevation setting in 100-foot (30-meter) increments. The “B”
pushbutton will decrease the elevation setting in 100-foot (30-meter) increments. The elevation setting is adjustable
from 0-9000 feet (0-2743 meters) and is displayed during adjustment.
c) When the correct setting has been achieved, allow the instrument to sit for approximately 20 seconds while not pushing
either of the buttons. The setting will automatically be stored into the instrument memory.
Note: Failure to correctly enter the local elevation may result in detection errors.
Hang the instrument from vehicle hood or storage cylinder.
Note: Laying the unit flat will cause calibration errors and inaccurate readings.
4. The instrument will now draw ambient air into the instrument through the air intake port for approximately 30 seconds.
The ambient air will be utilized to calibrate the detection devices and purge the instrument plumbing of residue refrigerant
vapors.
Note: For proper calibration, the surrounding ambient air must be clear of refrigerant vapors, hydrocarbons and oxygen
depleting compounds such as carbon dioxide or carbon monoxide.