


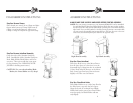


ASSEMBLY INSTRUCTIONS
Step One: Place Juice Bowl
Place Juice Bowl on top of the Motor Base so
that the Juice Spout is to the front (over the
Juiceman® logo). Align four tabs on underside
of Juice Bowl with four Buttons on the Motor
Base. Lower Juice Bowl onto Base and rotate
slightly to fit Tabs over the Buttons.
ALWAYS MAKE SURE JUICER IS UNPLUGGED BEFORE STARTING ASSEMBLY.
NOTE: For your juicing convenience, your Juiceman® JM418SS can be assembled
for right-hand or left-hand use. Right hand use allows the user to place produce
into the Feed Tube with the left hand while operating the Food Pusher with the
right hand. If you are left-handed, or feel the juicing operation is uncomfortable,
you can reverse the assembly instructions below so the Juice Spout is to the rear
of the unit (and all subsequent parts will face the opposite way).
Step Two: Place Blade Holder
Place Blade Holder on top of the Juice Bowl so
the Pulp Spout is opposite the Juice Spout.
Align square tab on underside rim of Blade
Holder with bend in rim of Juice Bowl. When
seated properly, the Blade Holder will turn
only slightly.
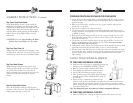
Right Hand Assembly
Left Hand Assembly
87
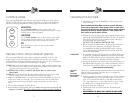
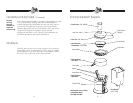
DISASSEMBLY INSTRUCTIONS
Step One: Remove Clamps
Place thumb onto center dot on Clamp and place
fingers under bottom of Clamp. Pull bottom of
Clamp out and push Clamp up. Allow top of
Clamp to swing out. Repeat for opposite Clamp.
Step Two: Remove Juice Bowl Assembly
Grasp the sides of the Stainless Steel Juice
Bowl. Carefully lift off the Stainless Steel Juice
Bowl, Blade Holder, Blade Basket, and Lid as
one piece. These pieces will then come apart
for easy cleaning. (See CLEANING YOUR
JUICER for cleaning instructions.)
CAUTION: Use care when handling Blade
Basket; the Cutter Blades are very sharp!