


4
GB
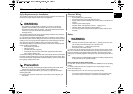
Microwave oven Installation Requirements
Requirements
The requirements for proper microwave oven operation are as follows:
• Operating Voltage: 24V DC.
• Breaking Voltage: Min. 21.5V, Max. 29.5V.
• Battery life must be at least 45Ah at 24V .
If possible, connect the oven to a separate supply battery (a secondary battery).
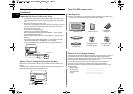
Supplied Items
Microwave oven, Turntable, Terminal Post Cover (plastic cover), Install
bracket(Left/Right), 6-#5 Tap screws, 7-#4 screws and Owner’s Manual. The
battery connection power cable is not included.
Items needed for Installation
Before installing the appliance, make sure you have the following items:
• 6-#5 Tap screws (The length of the screw is subject to the installation
requirements.)
• 7-#4 Tap screws (Outer panel screws).
• 2 connection power cables : one red, one black(refer to the page 6 for the
length and size of the connection cables)
• Power cable terminal, power cable binder, and electrical tape.
• Depending on the installation location, the following tools may be required.
• Stick ruler, chalk, hammer, and gimlet.
• Drill and borer.
• Ring/Fork type spanner set.
• Crimp pincers, soldering iron.
• Screw driver.
Installation
Installation Location Tips
• Before installing the oven, be sure to comply with the following: The
installation location for the oven should be even, flat, and sturdy.
• Do not allow humidity or heat to affect the oven.
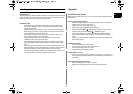
• Allow free space of about 50mm around the oven for ventilation (Fig.1).
• Take the oven’s weight into account. Check whether any protective
measure such as a large support base is necessary or not.
• To determine hole location, refer to the dimensions in Fig. 2 and follow the
instructions.
WARNING
When installing the oven in a vehicle, make sure that the installation location is
safe enough to avoid an injury. (including a vehicle’s sudden stop or accident).
To make a hole in an accurate location, create a mark in advance with a hammer
and punch.
Smooth any rough edges on the holes and apply rust proof treatment to them.
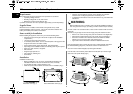
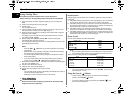
• Remove one screw securing outer panel of microwave oven (Right side).
• Attach left and right brackets to the outer panel using 8 screws(Fig.1).
• Secure the microwave oven brackets to the frame which has drilled
holes(Ø 4.0~4.2) using 6 screws (Tap Screws).(Fig.2).
• Fig.3 shows how the microwave should look attached to the frame.
If the electrical wiring does not work after the oven is fastened tightly, first follow
the “Electrical Wiring (Page 5-6)” instructions and then re-fasten the oven.
The oven must be fastened tightly to protect against vibration.
If do not want to use brackets, please attach 8 screws (#4x12) on left and right
side of the outer panel directly.(Fig.4)
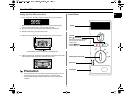
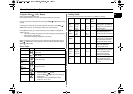
Microwave Oven (Fig. 1)
Front of Microwave Oven (Fig. 2)