


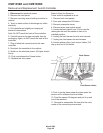

Removal and Replacement: Water Level Sensor
1. Remove front panel.
2. Push and hold the OFF button. Release it when
the machine stops.
3. Trace wire harness from water level sensor to
the AutoIQ Controller (#2). Unplug the harness
from the controller.
4. Lift the pump and mounting plate up enough to
remove the float from the stem.
5. Remove two screws holding the sensor to the
pump bracket and lift the sensor up and out of the
machine.
6. Reverse to reassemble.
Note: 5 evaporator models have a different float
stem from the 6 evaporator machines. Do not mix
the two.
·
5 evaporator (CME1356) uses a tan stem
·
6 evaporator (CME1656) uses a brown stem
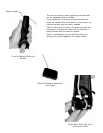
Discharge Line Temperature Sensor
1. Remove front panel, push and release the Off
button.
2. Remove top and left side panels.
3. Locate discharge line sensor. It is attached to
the discharge line of the compressor, 6" from the
compressor discharge port.
4. Un-snap the clip holding the sensor to the
discharge line.
5. Trace the sensor wires back to the controller,
they are plugged into #5 with the water
temperature sensor, and must be replaced with it.
6. Reverse to replace, be sure that the discharge
line sensor is 6" up from the compressor discharge
port. The discharge line sensor is marked with
yellow tape.
Note: Route wires so they do NOT contact the
discharge line.
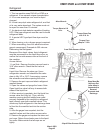
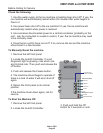
Water Temperature Sensor
Note: This sensor is replaced as a set with the
Discharge Temperature Sensor.
1. Remove left front panel.
2. Push and release Off button.
3. Remove 1 plastic bolt and the reservoir cover.
4. Locate water temperature sensor (inserted into
pump discharge hose).
5. Pull out to remove.
6. Trace back to AutoIQ Controller, unplug from
#5.
7. Remove the Discharge Line temperature
sensor.
8. Reverse to reassemble.
Note: Do not push sensor tip in too far. There
should be about an 1/8" gap between the tip and
the inner wall of the water discharge hose.
CME1356R and CME1656R
March 2003
Page 41