


A40086, SEEG R25AM O/M
3
INSTALLATION INSTRUCTIONS
ACCESSORIES
Check to make sure the following accessory is provided:
• Operation manual
• Caution Sheet (SPECIAL INSTRUCTIONS AND WARNINGS : part code TCAUHA 257 WRR0)
NOTE:
• When you order accessories, please mention the two items : part name and model name to your dealer or
SHARP authorized service agent.
• The model name is printed on the door of the microwave oven.
WARNING : Always keep the caution sheet (SPECIAL INSTRUCTIONS AND WARNINGS) close to the oven
for your reference.
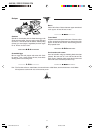
25 cm
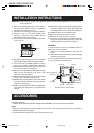
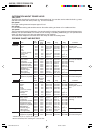
6-6)Remove the screw (a) holding the mounting plate B
to the rear cabinet of the oven B. And remove the
mounting plate B from the oven B. See the figure A.
6-7)Install the screw (a) to its position again.
6-8)Remove the screw (c) from the oven A.
6-9)Remove the screw (d) from the oven B.
6-10)Turn the removed mounting plat B over and then
using the removed screw (c) and (d), attach the
mounting plate B, as shown in the figure A.
WARNING:
In case where two ovens are installed together by
placing one on top of another.
1) Use the two mounting plates for fixing the two
ovens.
2) Make sure that the power supply cord is not caught
between the two ovens.
3) Do not install more than one oven on top of another.
4) Do not lose the removed screws.
Screw (a)
Screw
Mounting Plate A
Screw (b)
Screw (a)
Oven B
Screw (c)
Rear cabinet
Mounting Plate B
Oven A
(d)
Rear cabinet
1) Remove all packing materials from the inside of
the oven cavity. Remove all the blue protective
film from the outside of the oven.
2) Check the oven carefully for any signs of damage.
3) Place the oven on a flat, level surface strong
enough to support the oven's weight plus the
heaviest item likely to be cooked.
4) Ensure there is a minimum free space above the
oven of 25 cm.
5) Securely connect the plug of the oven to a standard
earthed (grounded) household electrical outlet.
6) Two ovens can be installed together by placing
one on top of another. Follow these instructions.
6-1)Place the oven A and position the oven B on top of
the oven A as shown in the figure A.
6-2)Remove the single screw (a) holding the mounting
plate A to the rear cabinet of the oven A. And
remove the mounting plate A.
6-3)Remove the single screw (b) from the rear cabinet
of the oven B, as shown in the figure A.
6-4)Reinstall the mounting plate A to the rear cabinet
of the oven B with the single screw (b) removed,
as shown in the figure A.
6-5)Hold the mounting plate A to the rear cabinet of the
oven A with the single screw (a), as shown in the
figure A.
Figure A: How to fix two ovens
SEEG R22/23/25.En1-14 03.8.28, 9:08 PM3