


7
INSTALLATION
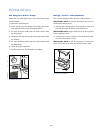
Plumbing
Model 315P–Pump Model
1) Place ice maker in front of installed location. Adjust
leg levelers to approximately correct position.
2) Remove control knob, control panel and control access
panel.
3) Route water inlet line from wall through ice maker to
the front.
4) Locate coil of 3/8" ID plastic drain tubing secured to
the back of the cabinet.
5) Route plastic drain tube from back of cabinet to drain
connection point.
IMPORTANT NOTE: Often an air gap is required by local
codes between the ice maker drain tube and the drain
receptacle.
6) If electrical outlet for ice maker is behind the cabinet,
plug in the ice maker now.
7) Push ice maker into installed position.
8) Cut off water inlet line at required length.
9) Flush water line. Place flare nut on inlet water line and
flare the end of the copper tube.
10) Attach flare nut to the male flare on the inlet water
valve.
11) Turn on the water supply, and make sure that the ice
maker is plugged in and the power is on.
12) Pour a couple of quarts of water into the storage bin,
the drain pump should start and pump water out.
Check for leaks.
13) Replace control knob, control panel and control access
panel.
14) Level the cabinet as needed.
IMPORTANT NOTE: All plumbing must meet local codes.
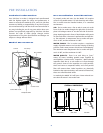
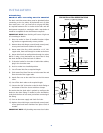
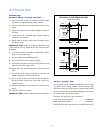
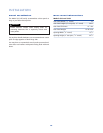
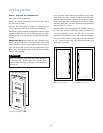
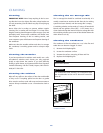
PRE-INSTALLATION SPECIFICATIONS
MODEL 315P (PUMP)
FRONT VIEW
SHUT-OFF
VALVE
WATER
FILTER
WATER
INLET TUBE
AIR GAP
DEVICE
DRAIN
TUBE
TOP VIEW
SHUT-OFF
VALVE
WATER
FILTER
WATER
INLET TUBE
DRAIN
TUBE
AIR GAP
DEVICE
24"
(609)
1
/8"(3)
15
1
/4"
(387) MIN.
15
1
/4"
(387) MIN.
34
1
/2"
(876) NOMINAL
33
3
/4"
(857) MIN.
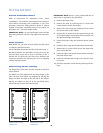
Drain Pump Kit
This ice maker can be ordered with (Model 315P) or with-
out (Model 315) a pump. Models without a drain pump
drain their water by gravity. However, gravity drain models
may be converted to pump models through the installation
of a drain pump kit and drain pump.
Two parts are required for this conversion:
Drain pump kit part number ...............A36892020
Drain pump part number ..................12250321
Specific step-by-step instructions are included with the kit.