


8
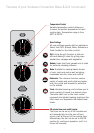
5. Select the appropriate setting for your
desired toast colour on the timer control,
noting that the white toast icon represents
the lightest toast shade and the black toast
icon represents the darkest shade.
6. A bell will sound when the selected toast
cycle has ended.
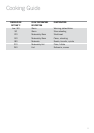
Note: Toasting times will vary depending
on the type of bread used. Sweet and fruit
breads generally take less time than white or
wholemeal breads.
To reheat
The bottom two elements will heat when the
'Reheat' setting has been selected.
1. Place the wire rack in either the raised
or sunken position, into the desired rack
support guide, depending on the type of
food / dish that is being reheated.
2. Place the food in an oven-proof dish.
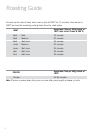
3. Turn the oven setting to 'Reheat'.
4. Select the desired temperature on the
temperature control. See page 11 for a
guide.
5. To turn the oven on, turn the timer
control to the desired time. Alternatively,
for continuous operation, turn the timer
control to the 'ON' position.
6. Stir food occasionally to ensure even
reheating of food.
Note: Use oven mitts to remove dish as it will
be very hot.
7. When finished reheating, the oven will
switch off automatically and a bell
will sound if the timer was selected.
Alternatively turn the timer to the 'OFF'
position if the continuous mode was
selected.
Rotisserie
The top two elements will heat when the
'Rotisserie' setting has been selected.
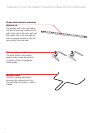
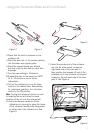
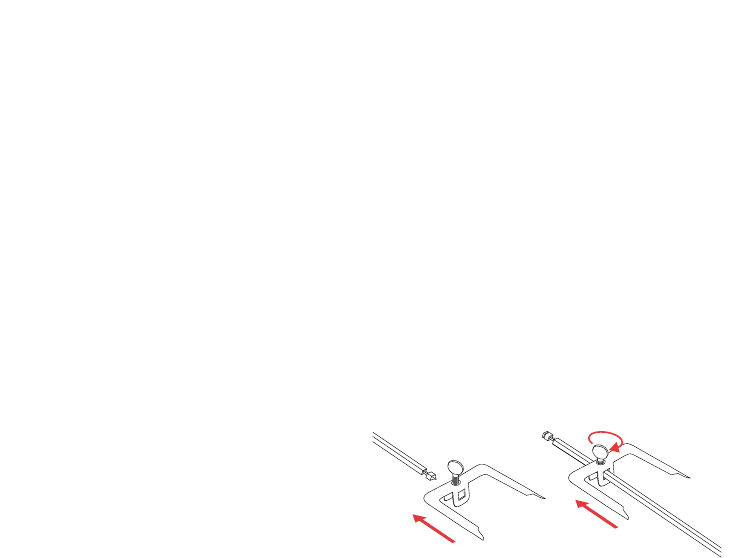
1. Insert the pointed end of the rotisserie
rod through one of the spikes, making
sure the points of the spike face in the
same direction as the pointed end of the
rotisserie rod. See Figure 1. Slide the
spike 6-7cm towards the squared off end
of the rod and secure in place with the
thumbscrew. See Figure 2.
2. Place food to be cooked on the rotisserie
rod by running the rod directly through the
centre of the food. Continue to slide the
food until the spike is securely imbedded
in the food.
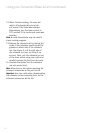
3. Slide the second spike onto the rotisserie
rod at the other end of the food. See
Figure 3. Continue to slide the spike until
it is securely imbedded in the food and
secure the spike with the thumbscrew.
See Figure 4.
Using your Convection Bake & Grill (continued)
Figure 1 Figure 2