


8 9
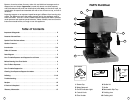
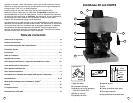
4. Insert the Filter Holder into the machine by holding the handle to the far left and
lifting up until it is seated in its groove. Then turn the handle to the right until it shifts
into the LOCK position.
5. Place the lidded Glass Carafe under the Filter Holder.
6. Rotate the Control Knob to the BREW position. The Indicator Light will activate to
indicate that the machine is on.
7. Once the coffee has finished brewing (3 – 5 minutes), turn the Control Knob to the
“OFF” position, and unplug the power cord. NOTE: Steaming and noise are a normal
part of the brewing process.
8. Pour each serving into a small cup and enjoy your Espresso!
NOTE: Please DO NOT remove Reservoir Cap or Filter Holder at any time while the
appliance is under pressure or until the appliance has cooled down.
TO CLEAN: To clean Frothing Aid and release the pressure, hold a pitcher with a small
amount of water under the Frothing Aid slowly turn the Control Knob to the STEAM
position and release the steam. When the Frothing Aid stops releasing steam, turn the
Control Knob to the “OFF” position and unplug the power cord.
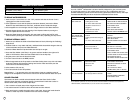
HOW TO MAKE CAPPUCCINO
Ingredients and Measuring Guide
Serving Size
Fine Espresso
Ground Coffee Water (Cold)
Milk (Skim or 2%
froths more easily)
1 cup 2 cup mark on Filter 2 oz. 4 oz.
2 cups 4 cup mark on Filter Fill to top of Metal
band of Glass Carafe
8 oz.
1. First, follow steps for How to Brew Expresso BUT using the
Cappuccino Ingredient and Measuring Guide above.
2. While espresso coffee is brewing, fill stainless steel
or ceramic frothing pitcher with desired amount of
cold milk. Once espresso coffee has finished brewing
to the desired 2 or 4 cup mark on the Glass Carafe,
turn the Control Knob to the “OFF” position.
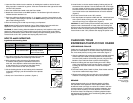
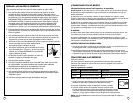
3. Lift the frothing pitcher so the Frothing Aid is immersed
in the milk, keeping it just off the bottom of the pitcher.
(Figure 3)
4. Slowly turn Control Knob to position. (Figure 4)
FIGURE 3
Immerse Frothing
Aid in milk
FIGURE 4
Turn knob to STEAM
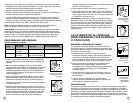
FIGURE 5
Lower pitcher to
froth the milk
FIGURE 6
Pour and serve
5. Move Pitcher in circular motion keeping Frothing Aid just off
the bottom of the pitcher. This will steam the milk. Then begin
to lower pitcher so the tip of the Frothing Aid stays just below
the milk’s surface. This will create the froth. Move the pitcher
in a circular motion until desired amount of froth is reached.
(Figure 5)
6. Turn the Control Knob to the “Off” position.
7. Pour equal parts of espresso coffee and milk. Hold froth back
with a spoon while pouring your milk, then spoon the froth
into the cup. Enjoy your Cappuccino! (Figure 6)
TO CLEAN: To clean Frothing Aid and release the pressure, hold
a pitcher with a small amount of water under the Frothing Aid
slowly turn the Control Knob to the STEAM position and release
the steam. When the Frothing Aid stops releasing steam, turn the
Control Knob to the “OFF” position and unplug the power cord.
CLEANING YOUR
ESPRESSO/CAPPUCCINO MAKER
AFTER BREWING: CLEAN-UP
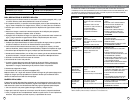
! Make sure to use the Filter Retainer Clip when discarding the
grounds. The metal parts of the Filter Holder might still be very
hot. Cool these parts by running under cold water (Figure 7).
1. After the machine has cooled and pressure has been released,
remove the Filter Holder by sliding handle to the left away
from the LOCK position. Discard the grounds, using the Filter
Retainer Clip to hold the Filter in place while emptying.
2. Remove Frothing Aid and wipe Frothing Arm with a damp
cloth. Using the Wrench built into the Scoop, unscrew the
Frothing Tip and clean valve with a needle or toothpick.
(Figure 8)
3. The Glass Carafe, Glass Carafe Lid, Filter, Filter Holder and Drip
Tray can be washed with soapy water.
4. Wipe housing with a soft wet cloth. Do not use abrasive
cleaners or scouring pads as they will scratch the finish.
DELIMING
Mineral deposits built-up in the Espresso Maker will affect
the operation of the appliance. Your Espresso Maker must
be delimed when you begin to notice an increase in the time
to brew espresso, or when there is excessive steaming. Also,
you may notice a build up of white deposits on the surface
of the brew head. The frequency of cleaning depends upon
the hardness of the water used. The following table gives the
suggested cleaning intervals.
FIGURE 7
Use Filter Retainer
Clip to empty Filter
FIGURE 8
Use Wrench on
Scoop to remove
Frothing Tip