


22
Models BC10/BW11Operating Procedures
030103
CAUTION: The permanent agitator i s designed to
withstand reasonable contact with the spinning
agitator shaft. However, it should not be forced or held
solidly against the side or bottom of the cup. This may
cause damage to the cup or components.
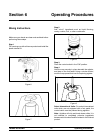
Step 5
After about 10 seconds have elapsed, slowly r emove
the cup by “swirling” it around the agitator. This will
create an ef fect that is pleasing to the eye, and avoids
leaving a hole in the center of the product.
Step 6
Before removing the cup completely, hold the top edge
of the cup near the spinning agitator to allow excess
mixture to be p rojected into the cup or the mix-through
collar .
Step 7
Release the foot pedal or place the control switch in the
“OFF” position.
Step 8
Prepare a durable container with an approved cleaning
solution (example: Kay-5r). USE HOT WATER
(110_F/43_C) AND FOLLOW THE MANUF ACTUR-
ER’S SPECIFICATIONS. If another approved cleaner
is used, dilute according to label instructions.
(IMPORTANT: Follow label directions, as too
STRONG of a solution can cause parts damage, while
too MILD of a solution will not provide adequate
cleaning.) Make sure all brushes provided with the
freezer are available for brush cleaning. Do not use a
solution that contains ammonia.
Note: The container must be deep enough to
submerge the entire agitator and shaft.
Step 9
Submerge the agitator in the cleaning solution, all the
way to the bottom of the motor chamber. Step on the
foot pedal or place the control switch in the “ON”
position. Allow the agitator to run for about 15 seconds.
Repeat this step several times, making certain all
portions of the agitator and shaft have been
submerged in the cleaning solution.
W ARNING: Never try to wipe clean the
agitator while it is active. Failure to follow these
instructions can lead to severe personal injury
from hazardous moving parts, or damage to the
unit.
Cleaning
The Taylor Company recommends daily cleaning.
ALWAYS FOLLOW LOCAL HEALTH CODES
Step 1
Prepare a sink with an approved cleaning solution
(example: Kay-5r). USE HOT WATER (110_F/43_C)
AND FOLLOW THE MANUF ACTURER’S
SPECIFICATIONS. Do not use a solution that
contains ammonia, and avoid placing components in
a d ishwasher.
Step 2
Disconnect power f rom the wall
receptacle. Failure t o comply may result in
electrical shock.
Step 3
Remove the splash guar d.
Wall mount units only (BW11):
Remove the sliding splash guard cup by squeezing the
travel rods together and sliding the guard downward.
Take the cup to the sink for c leaning.
Step 4
W ash the splash guard in the approved cleaning
solution.
Step 5
Using a single service towel (moistened with the
cleaning solution), wipe clean the travel rods and the
agitator shaft.
CAUTION: D O NOT REMOVE THE TRAVEL RODS
FROM THE UNIT.
Step 6
Remove the dispenser from the b racket b y tilting it
toward y ou and lifting upward.
Step 7
Discard any remaining topping.
Step 8
Remove the c over, s haft, dispensing plate, and
dispensing puck. Uns crew the handle f rom the
dispensing puck.
Step 9
Check all parts for cracks and damage, especially the
puck. Replace damaged par ts immediately.