


23
Models BC10/BW11 Operating Procedures
030103
Step 10
W ash all plastic parts in the approved cleaning
solution. CAUTION: PLASTIC PARTS ARE NOT
DISHWASHER SAFE! HAND WASH ONLY!
Step 11
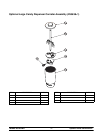
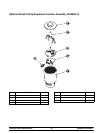
Re-assemble the dispenser. Make sure the dispensing
puck is placed in the canister with the counterbore face
down and with the threaded insert facing the s lot.
Note: Parts must be dry prior to assembling and
refilling them with mix ingr edients.
Step 12
Screw the handle through the slot and into the metal
insert in the dispensing puck. Place the dispensing
plate on top of the dispensing puck.
Step 13
Position the shaft through the plate and into the slot in
the dispensing puck. Make certain the shaft is properly
seated.
Step 14
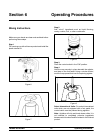
Install the dispenser. Place the dispenser on the wall
bracket with the locating pin facing the holding bracket.
The dispenser must be tilted toward the operator to
clear the handle. Insert the p in into the hole in the
bracket.
Note: When loading the dispenser with product, keep
powder away from the top of the shaft. Fill the canister
only within one inch of the top. Do not overfill the
canister.
Step 15
Wipe clean all stainless steel surfaces with an
approved, non-abrasive commercial cleaner. This
includes the mixer, dispenser, and organizer surfaces.
W ARNING: Do not spray water or other
liquid around the motor chamber. Do not use
excess liquid around the switch, motor protector,
power cords, or cord entry orifice. Make certain a ll
areas in and around the motor are dry before
connecting power to the wall receptacle. Failure to
comply may cause equipment damage or
personal injury due to electric shock.
Step 16
When foot pedal cleaning is required, disconnect it and
wipe it with a damp single service towel. Make sure the
foot pedal is thoroughly dry before re-connecting it to
the unit.
CAUTION: The foot pedal should be kept
dry. Do not leave it on the floor during mopping.
Failure to comply may result in electrical shock.
Permanent Agitator Cleaning
Step 1
Prepare a durable container with an approved cleaning
solution (example: Kay-5r). USE HOT WATER
(110_F/43_C) AND FOLLOW THE MANUF ACTUR-
ER’S SPECIFICATIONS. Do not use a solution that
contains ammonia.
Note: The container must be deep enough to
submerge the entire agitator and shaft.
Step 2
Submerge the agitator in the cleaning solution, all the
way to the bottom of the motor chamber. Step on the
foot pedal or place the control switch in the “ON”
position. Allow the agitator to run for about 15 seconds.
Repeat this step several times, making certain all
portions of the agitator and shaft have been
submerged in the cleaning solution.
W ARNING: Never try to wipe clean the
agitator while it is active. Failure to follow these
instructions can lead to severe personal injury
from hazardous moving parts, or damage to the
unit.
Step 3
Repeat Step 2 using cool, clean water in lieu of
cleaning solution.
Sanitizing
Step 1
Repeat all steps of the cleaning procedure using an
approved 100 PPM sanitizing s olution (example:
Kay-5
R). USE WARM WATER AND FOLLOW THE
MANUFACTURER’S SPECIFICAT IONS.
Step 2
Reinstall the splash guard.
Step 3
Repeat the sanitizing procedures at the start of the
day.
ALWAYS FOLLOW LOCAL HEALTH CODES