


4
5. PLATFORM GROOVE. Interlocks with lip of food tray when unit is
assembled.
6. FOOD TRAY. Fits into platform groove.
7. PADS. Add stability and cutting safety.
8. FOOD PUSHER. Interlocks with food tray for safe cutting.
9. THICKNESS REGULATOR WITH DIAL CONTROL. Adjustable dial
provides a range of thicknesses.
10. SERVING TRAY. (Not pictured)
USING YOUR FOOD SLICER
CAUTION: Blade is sharp. Unplug unit before cleaning. Never use slicer
unless completely assembled.
IMPORTANT: BEFORE USING YOUR FOOD SLICER FOR THE FIRST TIME
DISASSEMBLE AND WASH. SEE CARE AND CLEANING.
1. Unwrap cord and push firmly into slot on bottom of slicer.
2. Place slicer on a clean, dry smooth surface with the food platform
down. Attach the food tray to the food platform. Lip of tray should fit
into the platform groove.
3. Position slicer perpendicular to you on countertop so the switch is to
the back.
NOTE: Check “BLADE RELEASE KNOB” to make sure blade is tightly
in place. Food tray should slide smoothly in the track.
4. Slide food pusher over the food tray. Pull food tray towards you and
open food pusher to allow room for food placement.
NOTE: Foods must be cut to fit against both the food pusher and the
thickness guide.
5. Turn dial counter-clockwise for thin slices and clockwise for thick
slices.
TO SLICE
IMPORTANT: BE SURE MEATS ARE BONELESS BEFORE ATTEMPTING TO
SLICE
1. Plug into 120 V ~ 60 Hz outlet.
2. Pull food tray towards you. Place food on food tray between food
pusher and thickness guide. Press the “SAFETY SWITCH” and
“ON/OFF” switch to start the motor. For additional safety, motor stops
when “ON/OFF” switch is released.
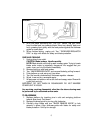
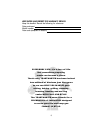
3. Hold food pusher with one hand, keeping thumb protected behind
thumb guard as shown (Figure 2).