


34
MORE RECIPES
The following recipes were developed by our Test Kitchen for use
in your Richard Simmons Steamer.
Soup/Sides
Curried Lentil Soup Serves 4
1 cup lentils, soaked overnight according to package directions
3
⁄
4 teaspoon dried parsley
2 cups fat-free chicken or vegetable broth
1 clove garlic, minced
2 cups sliced celery,
1
⁄
2 inch thick
2 cups sliced carrots,
1
⁄4 inch thick
1 onion,
1
⁄2 inch cubes
Sauce
2 cups low-fat chicken broth
1 teaspoon dried parsley
1 tablespoon curry powder
14 ounces canned diced tomatoes
1. Soak the lentils overnight according to package directions
and drain.
2. Place
1
⁄4 teaspoon of parsley and 1 teaspoon of water into
each Flavor Tray.
3. Place the drained lentils, 2 cups broth and the garlic into the
Cooking Bowl which fits into the Large Steamer Bowl. Set
the Timer for 55 minutes.
4. Place the celery and carrots into one of the Small Steamer
Bowls and set the Timer for 15 minutes.
5. Add the onions to the other Small Steamer Bowl and set the
Timer for 10 minutes.
6. Check all foods for doneness and continue cooking if necessary.
7. While the lentils and vegetables are steaming, combine the
sauce ingredients and in a pan and simmer on the stove for
20 minutes.
8. When the lentils and vegetables are done, stir them into the
simmering tomato sauce.
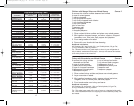
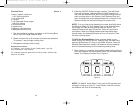
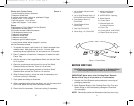
2. To set the cooking time, press the BOWL SELECT Button until
the desired Steamer Bowl is flashing in the Display (Figure 3).
3. Enter the cooking time using the + and – Buttons, then press
the BOWL SELECT Button to select the next Steamer Bowl.
The BOWL will stop flashing in the Display to indicate that it
is set.
NOTE: Each cooking time may be set for up to 99 minutes.
Hold down the + or – Button to advance through the cooking
times faster.
4. Repeat Steps 2 & 3 until each Steamer Bowl is set for the
appropriate cooking time.
5. Once all of the cooking times have been entered, press the
SET Button to confirm. All BOWL icons will stop flashing in
the Display. The Steamer will not start cooking until the
ON/OFF Button is pressed.
NOTE: To adjust any of the cooking times, press the BOWL
SELECT Button until the desired Steamer Bowl is selected, and
then use the + and – Buttons to revise the cooking time. Press
the SET Button again to confirm.
9
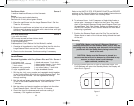
Figure 3
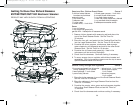
CAUTION: Make sure that all 3 Steamer Bowls are
securely positioned on the Steamer Base, even if they are
not being used for steaming; and that each Lid is securely
positioned with the Steam Vents facing toward the back of
the unit. Simply do not enter a cooking time for any
Steamer Bowl that is not being used.
EST7/EST7QVC/EST7 INF_IB_7-11 11/7/06 6:51 PM Page 23