


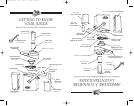
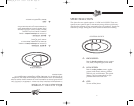
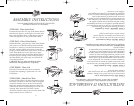


STEP ONE: Place Juice Bowl
Position the Juice Bowl on top of the Motor Base so
that the Juice Spout is to the right. Lower the Juice
Bowl onto the Motor Base so that the Juice Spout
slides through the oval ring in the Motor Base.
STEP TWO: Place Filter Basket
With both hands, grasp the rim of the Filter Basket
and center it over the Motor Base Hub inside the
Juice Bowl. Carefully lower the Filter Basket onto
the Hub, rotating slightly until it drops into the
proper position; then press firmly down on the rim
of the Filter Basket to secure. (Be sure to apply
pressure the both sides of the Filter Basket evenly
to ensure proper seating.) When seated properly,
the Filter Basket will spin freely and will not lift
out of the Juice Bowl.
CAUTION: Use care when handling the Filter
Basket; the Cutting Blades are very sharp!
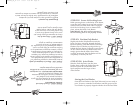
STEP THREE: Place Lid
Place the Lid onto the Juice Bowl so that the
Pulp Ejection Opening is positioned over the
Pulp Spout.
STEP FOUR: Attach Feed Tube
Center the Feed Tube over the Lid opening so that
the safety-lock hook on the Feed Tube is is slightly
clockwise from the arrow on the Lid. Insert the
three tabs located around the bottom of the Feed
Tube into the three corresponding slots in the Lid
opening, then rotate the Feed Tube counter-
clockwise until the safety-lock tab on the Feed Tube
aligns with the arrow on the Lid.
11
ASSEMBLY INSTRUCTIONS
ALWAYS MAKE SURE THE JUICER IS UNPLUGGED
BEFORE STARTING TO ASSEMBLE.
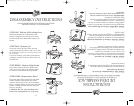
ÉTAPE UN : Poser le bol pour le jus
Placer le bol sur le socle, le bec vers la droite. Abaisser
le bol sur le socle de façon à ce que le bec glisse dans
l’anneau ovale du socle.
ÉTAPE DEUX : Poser le panier-filtre
Prendre le contour du panier-filtre en vous servant des
deux mains et le centrer au-dessus du moyeu du socle
à l’intérieur du bol. L’abaisser avec précaution sur le
moyeu et tourner légèrement jusqu’à ce qu’il tombe
dans la bonne position; appuyer ensuite fermement
sur le contour du panier-filtre pour fixer. (S’assurer
d’appliquer une pression égale sur les deux côtés du
panier-filtre pour qu’il soit bien placé.) S’il est bien
enclenché, il tourne librement et il est impossible de
l’enlever du bol.
PRÉCAUTION : Faire preuve de prudence lorsque vous
manipulez le panier-filtre; les lames sont très coupantes!
ÉTAPE TROIS : Poser le couvercle
Placer le couvercle sur le bol de façon à ce que
l’ouverture pour l’éjection de la pulpe soit au-
dessus du bec verseur pour la pulpe.
ÉTAPE QUATRE : Fixer la goulotte
Centrer la goulotte au-dessus de l’ouverture du
couvercle de façon à ce que le crochet de sécurité sur la
goulotte dépasse la flèche sur le couvercle (légèrement
dans le sens des aiguilles d’une montre). Insérer les
trois languettes autour de la base de la goulotte dans
les trois ouvertures correspondantes sur l’ouverture du
couvercle, puis tourner la goulotte dans le sens
contraire des aiguilles d'une montre jusqu'à ce que la
languette de sécurité sur la goulotte soit alignée avec
la flèche sur le couvercle.
11
INSTRUCTIONS D’ASSEMBLAGE
TOUJOURS S’ASSURER QUE LA CENTRIFUGEUSE EST
DÉBRANCHÉE AVANT DE COMMENCER L’ASSEMBLAGE.
JM300CAN_IB_31-5-07 6/1/07 2:35 AM Page 23