


opening at the back of the Base. The Water Reservoir will
snap into place as you press it firmly against the body of the
machine. Make sure the Removable Water Reservoir is
correctly positioned and in place before starting.
9. To replace the Carafe Lid, twist it until the Lid Lever is
opposite the Spout and sits directly over the Handle of the
Carafe. Make sure the Carafe Lid is properly secured onto
the Carafe. Place the Carafe onto the Base.
IMPORTANT: Always use fresh, cool water in your appliance.
Warm water or other liquids, except as listed in the Care and
Cleaning Instructions, may cause damage to the appliance.
NOTE: The amount of brewed coffee will always be less than the
amount of water placed into the Coffeemaker, since about
10% is absorbed by the coffee grounds and filter.
10. Locate the Cord Storage area at the bottom back of the unit.
Extend cord, fitting it into the bottom cord notch, and plug
the unit into a 120V, AC electrical outlet. The second hand
and AM/PM display on the bottom of the blue-lit analog
Clock will begin to flash. (See Figure 3.) Set the Clock
following the instructions below.
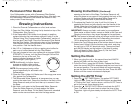
Setting the Clock
1. When you plug the unit in, the second hand and AM/PM
display will flash until the time of day is set.
2. To set the Clock, press the HR Button. Release the Button
when the correct AM/PM is displayed and the hour hand is at
the correct position. The second hand will begin sweeping
across the face of the clock to keep the time. Press the MIN
Button until the correct minutes are displayed.
Setting the AUTO Timer
1. Press the SET TIMER Button. The amber SET TIMER
Light will flash. Press the HR and MIN Buttons as described
in “Setting the Clock” section above, until the AUTO Timer is
set to the correct future brewing time.
2. Press the ON/OFF/AUTO Button to activate the AUTO
Timer. The Clock will revert back to show the time of day.
The amber Light will glow steady to indicate the AUTO Timer
is ON.
9
Brewing Instructions (Continued)
8
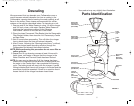
Permanent Filter Basket
Your Coffeemaker comes with a Permanent Filter Basket,
eliminating the need for disposable paper filters. After daily use,
the Removable Permanent Filter should be washed in hot,
sudsy water. Rinse thoroughly.
Brewing Instructions
1. Place the Thermal Coffeemaker on a flat, level surface.
2. Open the Filter Holder Lid using the lip located on top of the
Coffeemaker. (See Figure 1).
3. If the Removable Filter Holder is not already in position,
replace following the instructions outlined in step 2 in the
“Before Using Your Programmable Coffeemaker” section of
this Use and Care Guide. Place the Permanent Filter Basket
into the Filter Holder. The notched cutout of the Permanent
Filter Basket will face the right side of the Holder as it slips
into position. Fold the Handle down.
4. Add 1/2 to 1 tablespoon of drip or regular grind coffee for
each cup of coffee desired into the Filter Basket.
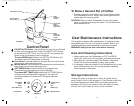
5. You may choose to brew your coffee with a stronger BREW
STRENGTH. To do so, turn the Brew Strength Control Dial
located on the top of the unit. The
arrows indicate a stronger or lighter
brew strength. (See Figure 4.)
NOTE: Additionally, to further brew a
stronger or milder coffee, adjust
amount of coffee to suit your taste.
NOTE: We recommend using coffee
ground specifically for automatic drip
coffeemakers.
6. Close the Filter Holder Lid. Make sure it fits snugly and shuts
fully against the Coffeemaker.
7. The Removable Water Reservoir is transparent so you can
monitor the water level. Grasp the Handle on the back of the
Water Reservoir and pull out and then up to remove it from
the Base.
8. Add fresh, cool water to the Removable Water Reservoir.
Close the Water Reservoir Lid and replace the Water
Reservoir onto the Base. Fit the Water Reservoir’s extended
water nozzle over and down and into the large center
FIGURE 4
Melitta_ME10DTB_IB_3-5-05 5/3/05 2:23 PM Page 15