


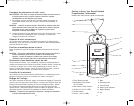
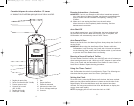
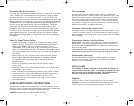
1. Poignées du panier-filtre
2. Panier-filtre amovible (Réf. 31146B)
3. Fonction pause et servir
4. Couvercle de la carafe
(Réf. 31147B)
5. Poignée de la carafe
6. Carafe (Réf. 31148B)
7. Base
8. Plaque chauffante
9. Tableau de commande
10. Indicateur de niveau d’eau
11. Écran à affichage numérique
12. Couvercle
Caractéristiques de votre cafetière 12 tasses
LE PRODUIT PEUT DIFFÉRER QUELQUE PEU DE CELUI ILLUSTRÉ.
1.
2.
10.
11.
4.
9.
8.
7.
6.
5.
3.
12.
4
Figure 1
Brewing Instructions (Continued)
IMPORTANT: If unit is not allowed to cool before immediate repeated
use, water placed in Water Chamber may become overheated and a
spray of steam could be released from opening, creating a risk
of burns.
10. When not in use unplug the Base from the wall outlet.
Allow the unit to cool completely before cleaning. See User
Maintenance Instructions.
Auto Shut-Off
As an added convenience, your Coffeemaker has been designed with
an Auto Shut-Off feature. When the brewing cycle is complete, the
Coffeemaker will automatically shut-off after 2 hours.
Auto Pause & Pour
Remove the Carafe from the Warming Plate. Always keep the Carafe Lid
on the Carafe.
IMPORTANT: When using the Auto Pause & Pour Feature while the
Coffeemaker is still brewing, the Carafe with Lid must be replaced
on the Warming Plate, under the Filter Basket within (1) one minute
to prevent the Filter Basket from overflowing.
Brewing a Second Carafe of Coffee
To brew another Carafe of coffee, turn unit OFF and wait 10 minutes to
allow heating element to cool. While unit is OFF, dispose of used coffee
filter, rinse Carafe and the Removable Filter Basket in water. Place a
fresh filter in Basket. Repeat brewing procedure.
Using the Timer Control
Your Coffeemaker has a built in multifunction Timer. The following sec-
tions describe the proper use of the Timer. (See Figure 2).
Setting the Clock
To set the clock, press the HR Button until the hour has been reached.
Make sure the proper AM/PM indicator is shown on the left side of the
Digital Display. Press the MIN Button until the minutes have been
reached. You may press and hold the HR or MIN Buttons to display the
correct time more rapidly.
NOTE: Unplugging the unit will reset the clock to 12:00.
8
RH_RH12DSBCAN_IB_13-5-05 5/13/05 4:45 PM Page 17