


Interior Oven Light
The light will be ON anytime the unit is in operation. To replace
oven light see page 20.
Rack Positions
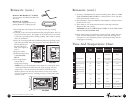
The Wire Rack can be inserted into positions 1, 2, 3, 4, 5 or 6
(See Figure 4 for shelf positions). Baking on both the Wire Rack and
Bake/Broil Pan at the same time is not recommended except when
using the SLOW COOK setting.
Pizza Rack and Pizza Pan Positions
The Pizza Rack can be inserted into positions 3, 4, 5 or 6 (See figure 4
for shelf positions). Baking on both the Pizza Rack and Bake/Broil Pan
at the same time is not recommended.
Defrost
1. Insert the Wire Rack into the Lower Shelf Rail.
2. Plug into 120 V 60 Hz outlet.
3. Remove all protective wrappings from food before placing in
Oven-Broiler.
4. Center a baking container or food on the Wire Rack or use the
Bake/Broil Pan and close the Glass Door.
5. Turn the Function Control to Defrost.
6. Set the Temperature Control to 200°F.
7. Turn the Timer to the desired time or to the ON position. The
Power Light will illuminate.
NOTE: To set the Timer Control for less than 1 hour, turn the timer
past 1 hour, and then turn back to the appropriate amount of time.
CAUTION: As soon as the Timer Control is engaged, the Oven-
Broiler will turn ON. Both the top and the bottom Heating Elements
may cycle ON and OFF to maintain temperature for the entire
cooking time.
CAUTION: As soon as the Timer Control is engaged both Heating
Elements will become hot immediately. Use care not to place
anything on top of the Oven-Broiler. Do not touch the Oven-Broiler
or any part of the Oven-Broiler without wearing oven mitts.
6.
7.
Convection Oven-Baker Use and Care Guide
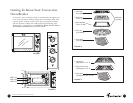
Selector Dial
The oven has four different settings: DEFROST, BROIL, SLOW
COOK AND BAKE. Turn dial to indicator line above dial to select
setting. The convection fan is ON in all modes.
Temperature Control Dial
Your oven has an adjustable temperature control dial with
temperatures 200°-450° Fahrenheit. This allows you to prepare
recipes according to package or recipe directions.
Timer
The timer control dial also acts as the oven’s ON and OFF switch.
Turn the timer clockwise to select appropriate cooking time. The dial
is marked with 1 or 2 hour (HR) in 15 minute segments. If cooking
less than 1 hour, turn the timer past 1 hour, then back to desired
cooking time. When cooking time is complete, a signal will sound and
the unit will turn OFF automatically.
On
If you are cooking for less than 15 minutes or do not wish to use the timer
feature, turn the dial to ON to turn oven on. Return to OFF position
when cooking is complete. The indicator light will go OFF.
Power Light
The Power Light will remain ON anytime the oven timer is turned ON.
Heating Elements
On the SLOW COOK setting, constant low wattage heat is provided
by the top and bottom elements. On the BAKE setting, the top and
bottom elements will turn OFF and ON as the thermostat cycles to
control the cooking temperature. On the BROIL and ROTISSERIE
settings, only the upper elements cycle ON and OFF. The indicator
light will cycle ON and OFF with the thermostat.
NOTE: Some elements will appear black during certain heating
functions. This is normal.