


6. With a spoon or spatula, load freshly prepared cookie dough/filling
into the top of the Tube.
NOTE: To ensure proper operation, do not fill the Tube past the
MAX Fill Line. DO NOT OVERFILL!
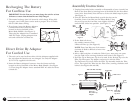
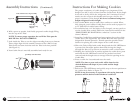
7. Look inside the Tube to see the ridges extending from top to bottom.
These ridges align with the outside contours of the 2 Discs. Grasp
Tube firmly and turn clockwise until the Tube locks into position.
(See Figure 9.)
8. Your Cookie Press is now fully assembled and ready for use.
Instructions For Making Cookies
The proper consistency of cookie dough is very important. If the
dough is too stiff, it won't release from the Cookie Press. If the dough
is too soft or sticky, chill in the refrigerator for 15 minutes. For best
results, use the recipes in this booklet until you get a feel for the
proper consistency of the dough. We do not recommend using store-
bought refrigerated cookie doughs.
1. Your Cookie Maker may be used either cordless or corded. When
fully charged, your Cordless Cookie Press can be used to prepare 10
to 15 Tubes full of cookie batter/filling.
2. For unlimited use, or if the battery is not charged, you may prefer to
use the Cookie Press corded. Follow the instructions outlined in the
“DIRECT-DRIVE BY ADAPTOR for corded use” section of this
Owner’s Manual.
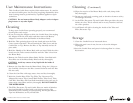
3. Stand the Cookie Press upright and press against the surface of the
cookie sheet. (See Figure 10.) The Cookie Press has been specially
designed for thumb operation. Thumb operation provides better
balance for placing the cookie shapes on the cookie sheets.
4. When the Tube is filled with cookie dough and the ON/OFF Button
is pressed, the Press Disc pushes downward, forcing the dough
through the Disc or Tip to form an attractive cookie or decoration.
5. Holding the Cookie Press in position against the cookie sheet, press
and hold the ON/OFF Button until the air pockets have been
removed and the dough starts to emerge from the openings in the
Cookie Disc.
6. Press a cookie for 2 seconds and note the result.
NOTE: The time to press each cookie will be based on the
desired thickness and shape of your cookie and the dough
you are using.
7. Release the ON/OFF Button and quickly step to the next position on
the cookie sheet. Refer to Figure 11.
NOTE: It may be necessary to experiment with varying times and
pressures until the desired cookie thickness is achieved.
9.
9.
8.
Cordless Cookie Press Use and Care Guide
8.
Assembly Instructions (Continued)
Figure 9
Join Body with filled Tube
Figure 10
Figure 11
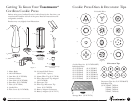
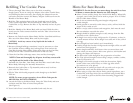
Figure 8B
Decorator
Tip
Tube
Cover
Tube with Decorator Tip Assembly
Filler Tip/
Decorator Tip
Adaptor
Filler Tip/
Decorator
Tip Cover