


11.
11.
10.
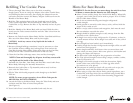
Cordless Cookie Press Use and Care Guide
10.
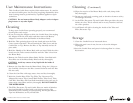
Hints For Best Results
IMPORTANT: For the first use you must charge the unit for at least
24 hours to ensure that the batteries are fully charged.
◆ Allow 6 hours to fully charge the Cookie Press Battery. When fully
charged, your Cookie Press can be used to prepare 10 to 15 Tubes
full of cookie batter/filling.
◆ We do not recommend using store-bought refrigerated
cookie doughs.
◆ Avoid greased or non-stick cookie sheets, as they will not hold the
shape of the cookie as well.
◆ When a recipe calls for butter and margarine, both must be used.
Do not substitute one with the other.
◆ Dough should be pliable enough to easily emerge from the Disc
and stick on the cookie sheet.
◆ If dough is too soft or sticky, refrigerate for 15 minutes, or beat in
a small amount of flour. If the dough is too stiff, mix in the yolk of
one egg.
◆ Once dough has been loaded, use it immediately.
◆ Cookie dough that has been refrigerated overnight will be too stiff
and will not work properly.
◆ Some doughs and Discs work better when you move faster, and
some when you move slower. After some practice, with rhythm and
timing, the shapes will improve.
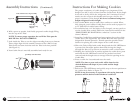
◆ Use Discs with cookie dough for the preparation of cookies.
◆ Use Tips with soft dough for decorating canapes, candies, cookies,
desserts, fill pastries, etc.
◆ If dough is not moist enough to hold the decorations, lightly
brush a little water, milk, honey or a little egg white where
decorations are to be placed.
◆ The amount of cookies per batch will vary with each recipe, the
Cookie Disc used, and the thickness of the cookies.
◆ When using a recipe that calls for finely grated ingredients, use a
Cookie Disc with large holes. We recommend using Cookie Discs
3, 4, 5, and 10 to prevent the Disc from becoming clogged with
cookie dough.
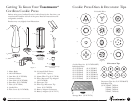
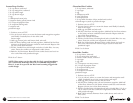
Refilling The Cookie Press
1. The see-through Tube allows you to check the remaining
dough/batter. If you are using the Adaptor, direct-drive Cookie Press,
and refilling becomes necessary, first unplug the Adaptor from the
wall outlet and then remove the Battery Adaptor Connector from the
Handle of the Motor Body.
2. Hold the Tube pointing down with one hand and turn the Tube
Cover counter-clockwise. This will unlock the Tube Cover and the
Cookie Disc or Tip. Remove the Disc or Tip Assembly and set all parts
aside.
3. Hold the Handle of the Motor Body with one hand. With the other
hand, turn the Tube counter-clockwise until the Tube is free from the
Motor Body.
4. Remove the Tube from the Motor Body. Pull the Cam Shaft with Press
Disc out of the Motor Body. Rinse and dry thoroughly.
CAUTION: Avoid any contact of any liquid with the inside of
Motor Body.
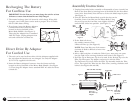
5. Because of dough build-up, sometimes it may be necessary to clean
the Cam Disc before refilling the Cooking Press. First remove the
Cam Disc from the Motor Body. Using the 2 Grips on the Cam Disc,
firmly turn the Disc counter-clockwise until it lifts out easily.
6. Clean the Cam Disc with soapy water, rinse and dry thoroughly.
NOTE: Clean and thoroughly dry all parts. Avoid any contact with
any liquid and the inside of the Motor Body.
7. Assemble the Cam Disc, Cam Shaft, and Press Disc onto Cookie Press
Motor Body, following the Assembly Instructions.
8. Reattach the Cookie Disc or Tip Assembly and securely lock into
place with the Tube Cover.
9. Fill the Tube with freshly prepared cookie dough up to the MAX
Fill Line.
NOTE:
To ensure proper operation, do not fill the Tube past the
MAX Fill Line. DO NOT OVERFILL!
10. Attach the Tube to the Motor Body. Grasp the Tube firmly and turn
clockwise until the Tube is locked into position.
(See Figure 9.)
11. Your Cookie Press is now fully assembled and ready for use.