


7.
7.
6.
Cordless Cookie Press Use and Care Guide
6.
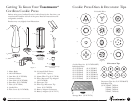
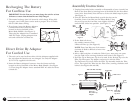
Recharging The Battery
For Cordless Use
IMPORTANT: For the first use you must charge the unit for at least
24 hours to ensure that the batteries are fully charged.
1. The normal recharge time is 6 hours for a full charge. When fully
charged, your Cookie Press can be used to prepare 10 to 15 Tubes
full of cookie batter/filling.
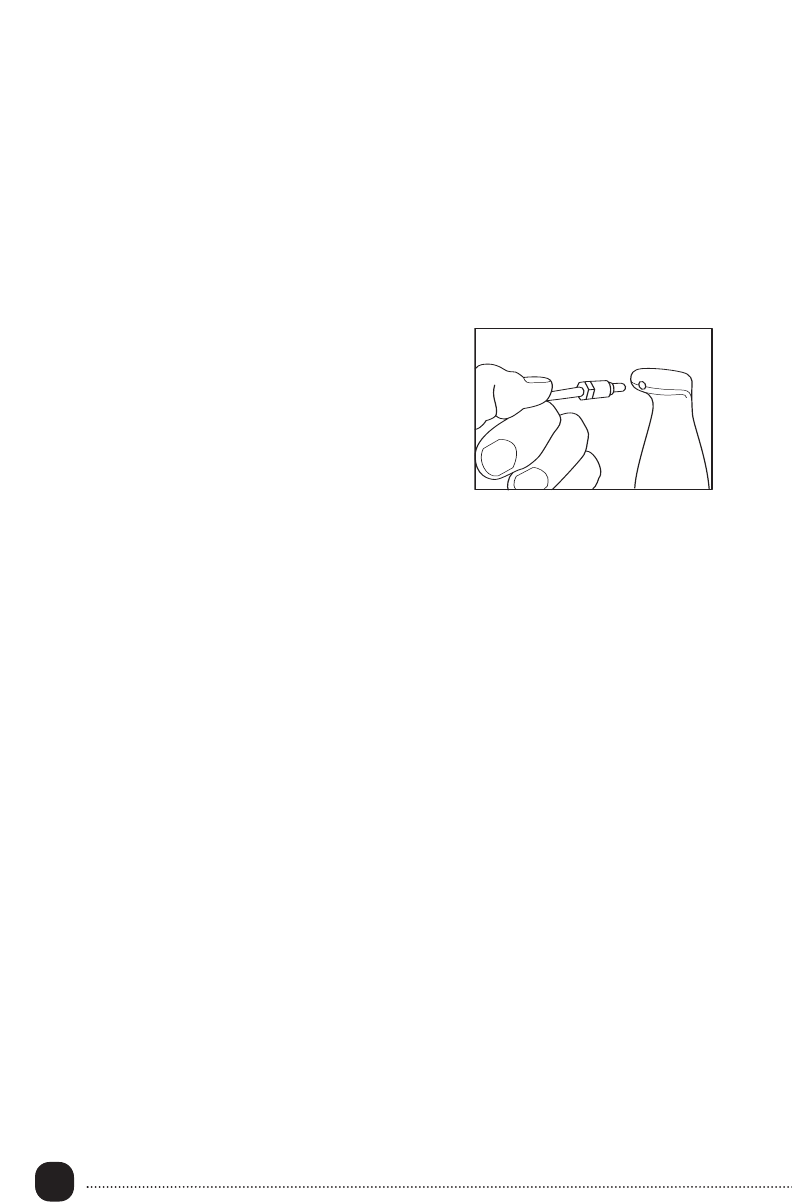
2. To recharge, insert the Battery Adaptor
Connector into the Connector Inlet
located at the top backside of the
Motor Body Handle. (See Figure 3).
Then plug the Adaptor into a standard
120V AC outlet. Unplug Adaptor from
unit and wall before cordless use.
Direct Drive By Adaptor
For Corded Use
1. The unit can be used as direct-drive with the Adaptor supplied with
the unit when the batteries are not charged. Use only the Adaptor
(P/N 71171) supplied with this unit.
2. Insert the Battery Adaptor Connector into the Connector Inlet
located at the top backside of the Motor Body Handle. (See Figure
3). Then plug the Adaptor into a standard 120V AC outlet for direct
corded use.
Figure 3
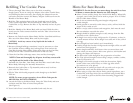
Assembly Instructions
1. Unplug from outlet before assembly or disassembly of parts. Attach Cam
Shaft to the Press Disc by inserting stem of the Shaft into the Press Disc’s
center hole. Press firmly. You will hear a click as the Shaft snaps in place.
(See Figure 4.)
2. Line the Tabs on the Motor Body up with the slots on the
Cam Disc. Insert Cam Disc into the Motor Body. Using
the two Grips on the Cam Disc, turn slightly clockwise
until the Disc clicks into position. (See Figure 5.)
3. Fit the Shaft all the way inside the unit,
the outside contours of the
2 Discs will line up. (See Figure 6.)
NOTE: Turn Cam Disc one click counter-
clockwise if Shaft is difficult to insert into
Motor Body.
4. Select a Disc and place it inside the Tube Cover. Then place the Tube
into the Tube Cover, turning clockwise until locked. (See Figure 7.)
5. If a Filler Tip or Decorator Tip is to be used, fit the desired Tip over the
Filler Tip/Decorator Tip Adapter and secure it with the Filler
Tip/Decorator Tip Cover. Place the Filler Tip Assembly inside the Tube
Cover. Then place the Tube into the Tube Cover, turning clockwise until
locked. (See Figures 8A and 8B.)
Figure 4
Figure 7
Figure 8A
Filler Tip
Cookie Disc
Filler Tip/
Decorator
Tip Cover
Tube
Cover
Tube Cover
Tube with Filler Tip Assembly
Tube with Disc Assembly
Figure 5
Filler Tip/
Decorator Tip
Adapter
Tabs
Slots
Cam Disc
Grips
Press
Disc
Cam
Shaft
Figure 6