


TLM, TLF, TLD
Page 10
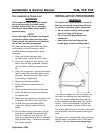
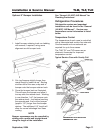
Rear Rail Cover & Close-off Installation
(Cases with Pipe Legs)
Position rear rail cover (1) over rear raceway
opening and secure with screws in every
hole.
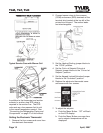
Bottom and End Close-off Installation
Kickplate, optional rear bottom and end
close-offs have spring clips on their back
sides that secure to the pipe legs.
NOTE
Optional rear bottom close-offs do not
require joint trim.
1. Before installing kickplates on a multiple
case lineup, snap a joint trim (2) over
the top and bottom of one of each
kickplate (3).
2. Lineup each kickplate (3) and/or optional
rear bottom close-off (4) and push to
secure the spring clips to the legs (5).
3. Slide joint rrims (2) over the case-to-case
joints.
4. Position end close-offs (6) over the end
of the kickplate (3) and/or optional rear
bottom close-off (4) and push until the
spring clips secure to the legs.
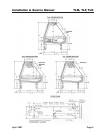
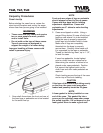
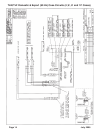
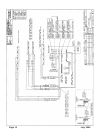
Trim Installation
The joint trim and mounting hardware are
shipped loose. Trim includes top joint trim
(1), rear upper joint trim (2), rear lower joint
trim (3), front kickplate joint trim (4), front
lower cladding joint trim (5) and front upper
cladding joint trim (6), color band backer (7),
glass stop joint trim (8) and horizontal joint
trim (9).
Horizontal joint trim covers gaps between the
cases. The trim is glued onto the shipping
cardboard. If trim has a notched side, apply
trim with notched side towards front of case,
after running beads of caulking on the edges
of the cases. Sheet metal screws can be
used for additional securing.
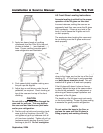
Patch end trim is shipped factory installed. If
field installation is required, be sure the patch
end is pulled up enough to fit snuggly against
the sealing tubing on the inside of the case.
The patch end must seal tightly against the
lift glass wiper to ensure proper operating
temperatures.
April, 2007