


TLM, TLF, TLD
Page 26
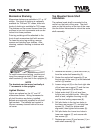
Mezzanine Shelving
Mezzanine shelves are available in 10” or 12”
widths. One level of shelving is optionally
available for TLM and TLF cases, while two
levels of shelving is available for TLD cases.
The shelves can be moved forward from the
mullions in two inch increments and can be
locked into three positions.
Price tag moldings will be attached to the
front of each mezzanine shelf with screws.
To clean the price tag molding, remove
screws and molding from shelves. After
cleaning, reattach molding to shelves with
screws.
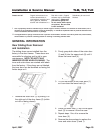
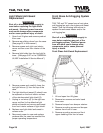
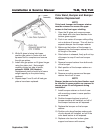
To install mezzanine shelving, position and
insert the mezzanine shelf (1) and captive
shelf brackets (2) into slots in the uprights (3).
NOTE
The brackets can be moved vertically at
1” increments in the uprights.
Lighted Shelves
Lights are optional on the 10” and 12”
mezzanine shelves. Wiring harnesses for
all shelf locations are factory installed.
Ballasts are optionally supplied for all shelf
light sockets. The ballasts are located in
the rear raceway channel behind the rear
rail cover.
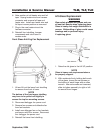
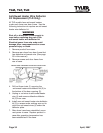
Top Mounted Scale Shelf
Installation
The optional scale shelf is mounted to the
mullion on the back of the case. The shelf
rests on the flat portion of the top of the case.
Use the follow instructions to mount the scale
shelf assembly.
1. Remove the screws (1) and rear cover (2)
from the scale shelf assembly (3).
2. Center the scale shelf assembly (3) on
the top rear of the case (4) at the selected
mullion (5) location.
3. Loosen wing nut (6) on the front right side
of the lower rear support (7) and the two
locking capscrews (8) at the rear.
4. Adjust scale shelf (3) to sit level from
front-to-rear and side-to-side. When the
shelf is level, retighten the wing nut (6)
and the two locking capscrews (8).
5. Drill pilot holes in the top two holes in
the lower rear support (7), and start two
screws (9). Check for proper shelf
alignment, then tighten two screws (9).
6. Drill pilot holes thru lower two holes in
lower rear support (7) and secure with
two screws (9).
7. Replace rear cover (2) and screws (1) on
scale shelf assembly (3).
April, 2007