


SKU 45198 For technical questions, please call 1-800-444-3353. Page 7
MAINTENANCE AND CLEANING
1. CAUTION: Never perform any services or maintenance on the Cement Mixer
while it is running. Before performing services or maintenance, turn off the en-
gine and disconnect the spark plug wire to prevent accidental starting.
2. Before each use, inspect the general condition of the Cement Mixer. Check for
loose screws, misalignment, binding of moving parts, loose or broken parts, and
any other condition that may affect its safe operation. If abnormal noise or vibra-
tion occurs, turn off the Cement Mixer immediately and have the problem cor-
rected before further use. Do not use damaged equipment.
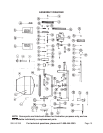
3. Retighten the V-Belt (46) after the first 24 hours of use. The V-Belt should be able
to be pressed in no more than 1/4”. (See Assy. Diagram.)
4. Periodically, recheck all nuts, bolts, and screws for tightness.
5. Thoroughly clean the Cement Mixer at the end of each day’s operation. The
Drum Assembly (4) may be scoured for approximately two minutes, using a
gravel and water mixture. Then, discharge the gravel/water mixture and hose
down the Drum Assembly inside and out. (See Assy. Diagram.)
6. Dried cement mix should be scraped out of the Drum (4). Do not beat on the
Drum with a shovel or other tools to break up accumulations of dried cement mix,
as damage to the Cement Mixer may result.
7. Do not pour or spray water over the Gas Engine (45).
(See Assy. Diagram.)
8. Daily check the oil level in the Gas Engine (45). Refer to the Gas Engine man-
ufacturer’s manual for the type and level of oil recommended, and all other Gas
Engine service and maintenance instructions.
9. Periodically, inspect the Speed Converter Assembly (19) and the Wheel Bearings
(77) for proper lubrication. (See Assy. Diagram.)
10. Yearly, repack the four tapered bearings inside the wheel hubs and replace the
wheel seals. Install the washer and nut. Torque to 20 ft-lb, back off one turn,
torque again to 7 ft-lb, back off to first slot and install new cotter pin.
REV 05/06