


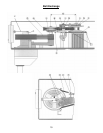
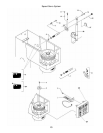
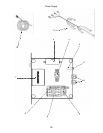

Belt Exchange
18
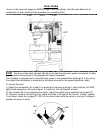
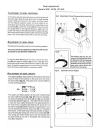
1. Loosen Bolt (J) and remove washers (H).
2
2. Remove cotterpin (T) and dowel pin (E) from servo linkage.
2 .
3. Remove vari drive belt (A) from pulleys.
2
4. Remove Hall Effect sensor (X) from the rear of the computer.
3
5. Loosen bolts (D) and remove the front v-belts (C) by tilting the center pul
....ley assembly (L) forward and rolling the belts (C) off the front pulley one
....at a time. The belts can now be threaded between the lower fork (M) and
....the lower movable pulley.
3 3 3
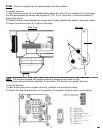
3 Installing and tightening of V-belts
3
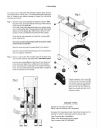
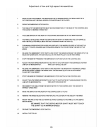
6. Install the V-belts (C) on the center pulley assembly and front pulley.
3
7. Tighten the two bolts (D).
3
8. Tighten the bolt (F) until the V-belts are tight, then tighten the the 2 bolts
....(D).Back bolt (F) out away from arm. DO NOT LEAVE AGAINST ARM.
9.
9. Install the Hall Effect sensor (X) onto the computer and align.
....(See page 11)
.
10. Measure the distance (B) to insure it is within tolerance...
......Models W30-W40(P) Distance (B) 11 1/2 inches
......Models W60-W150 Distance (B) 12 1/4 inches
.
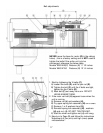
11. If the measurement is out of spec, the motor assembly should be moved
......by loosening the four bolts (P) on the motor mount plate, sliding the
......motor until it is within the proper distance, and retighten bolts (P).
.
12. Install the vari drive belt. (A)
.
13. Install fork assembly.
.
14. Install washers (G) and nut. (J) DO NOT TIGHTEN NUT.
.
15. Start the mixer and tighten nut. (J)
16. Follow the instructions on Page 20,.“Adjustment of min and max speed
......microswitches”.