


PROGRAMMING
The Vitamix XL™ Programmable is pre-programmed with blending cycles
that are optimized for a variety of applications. The programs can be customized
by using a programming chip or programmer software kit available from Vitamix®.
Call your distributor or Customer Service for more information.
Although your machine comes from the factory pre-set with the Vitamix XL™
programs, follow these instructions when using a custom programming chip.
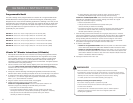
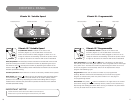
Programming with a Custom Chip
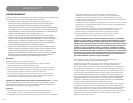
1. Turn the power to the machine on using the On/O switch located on
the side of the machine.
2. Remove the container and locate the programming port which is on the side of the
machine next to the On/O switch. Insert the custom programmed chip with the
silver contact bars and the words, “This Side Facing to the Front of the Machine”
up into the port located below the label area.
3. Within 5 seconds, the six pre-set programs will be re-programmed.
4. Remove the programming chip, return it to the original package and store in a safe,
easily accessible spot.
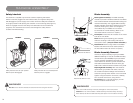
Resetting Pre-Set Programs to Factory Settings
1. Turn the power to the machine o using the On/O switch
located on the side of the machine.
2. Hold down the pulse switch while turning the power back
on using the On/O switch.
12
13
OFF
ON
16 A
FIGURE A
IMPORTANT NOTES!
Programming Chip: If the above programming steps are taken and the
custom programming does not appear with the first blend cycle, turn the
chip 180˚(side-to-side) and try again.
FIGURE A FIGURE B
FIGURE C
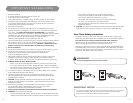
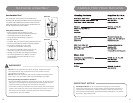
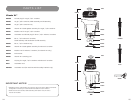
Lid Assembly
Two-Piece Accelerator Tool Lid, 64 oz. / 2,0 L Advance® Container
• To secure lid, place on top of container and gently press down until lid snaps into
place, making sure the latches are secured around the top of the container rim.
• To remove a fully latched lid, lift one of the two tabs and pull upward and o.
• Twist the center lid plug to fasten or remove.
• The lid plug can be removed when using the accelerator tool or adding ingredients.
Two-Piece Lid (optional), 64 oz. / 2,0 L Advance® Container
• To secure lid, place on top of container and gently press down until lid snaps into
place, making sure the latches are secured around the top of the container rim.
• To remove a fully latched lid, lift one of the two tabs and pull upward and o.
• Twist the center lid plug to fasten or remove.
• Do not use with accelerator tool.
Two-Piece Lid, 1.5 gal. / 5,6 L Container
• To secure lid, place on top of container and gently press down until lid snaps into
place, making sure the latches are secured around the top of the container rim.
• To remove a fully latched lid, lift one of the two tabs and pull upward and o.
• Twist the center lid plug to fasten or remove.
• The lid plug can be removed when using the accelerator tool or adding ingredients.
IMPORTANT NOTES!
Containers: Vitamix XL™ blenders are optimized for use with the 1.5 gal. / 5,6 L
and Advance® 64 oz. / 2,0 L containers. Other Vitamix standard containers
(64 oz. / 2,0 L, 48 oz. / 1,5 L, or compact 32 oz. / 0,9 L) are not compatible.
Call Vitamix Customer Service or your distributor for more information.
Lids: To make new lids easier to insert and remove, rub a light coating of cooking
oil around the rim where it seals. Place it on a container for several minutes,
remove and lightly wipe oil o lid.
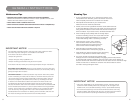
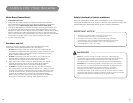
MACHINE ASSEMBLY
Circuit Breaker On/O Switch Programming Port